Wolf Pencil Case Pin Loom Pattern

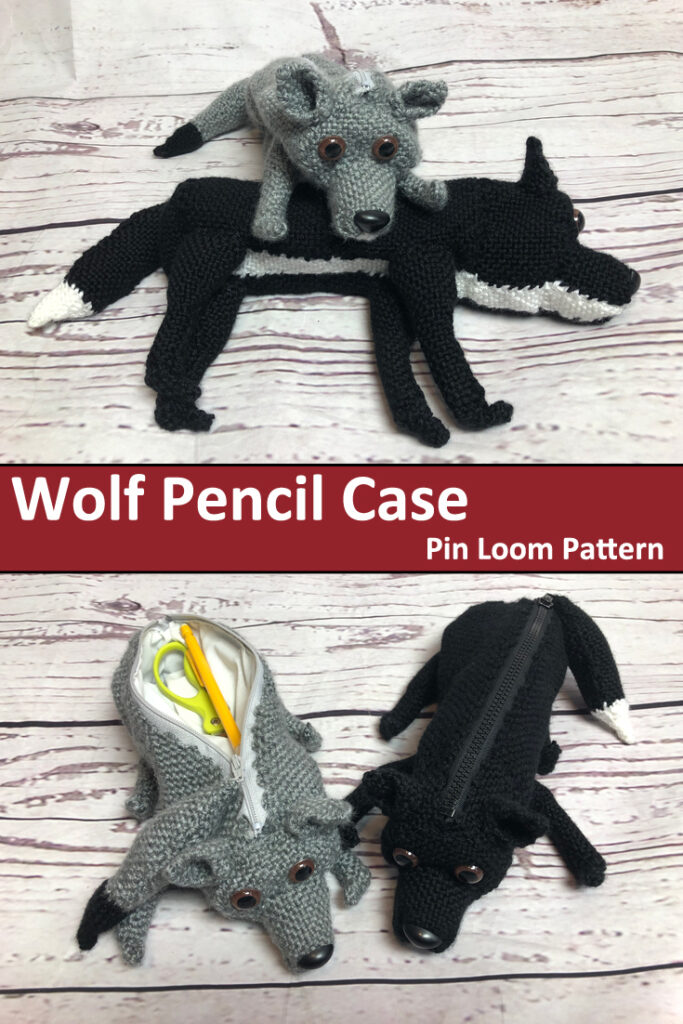
There’s no need to scratch and claw through the junk drawer looking for a pen. Make your own wolf pencil case with yarn and pin looms to store them in. These are great for holding pens, pencils, crochet hooks, mini scissors and more. And since it’s pin loom woven, you can even weave your needle through the outside of the case when you’re not using it.

The wolf pencil case measures approximately 12” long x 7” tall x 4” wide.

Pin These Pictures to Pinterest.

Share the love, pin this image to Pinterest.

Wolf Pencil Case Available on Etsy

The Wolf Pencil Case Pin Loom Pattern is now in our Etsy Shop.

Available now on Etsy.

Buy Now on Etsy

About the Wolf Pencil Case Pin Loom Pattern

This pencil case was a special request from one of the boys…he wanted a coyote. Both wolves and coyotes are a bit dog like, so sure, it’s not a wolf, it’s a coyote!

The pattern is 5 pages which includes step-by-step written instructions. There are 10+ photos that show the pencil case at different points of construction. Instructions are for the grey wolf, though step-by-step photos are often for the black dog. The shape for the black dog and grey wolf are the same.

Here’s what you’ll need to make the Pin Loom Wolf Pencil Case:

  • Pin Loom Square: 1”, 2”, and 4”
  • Pin Loom Rectangles: 2”x4”, 1”x4”
  • Yarn:   Red Heart: Soft – Medium (4), acrylic, 5 oz/256 yds
  •             Grayscale #9931
  •             Black #4614
  •             White #4600
  • Needle:           6” needle for weaving and yarn needle for sewing
  • Safety eyes: (2) 14mm
  • Safety nose: 2cm
  • Zipper: 9” in color of yarn
  • Fabric for lining: approximately 12” x 12”
  • Can – with 2 5/8” diameter for helping sew the ends to the body of the pencil case (optional)
  • Notions: straight pins, needle and thread

Please note that there are not photos to match each step-by-step written instruction. But there are photos throughout the pattern to help provide clarity.

PDF Instant Download Available

Buy the Wolf Pencil Case Pin Loom Pattern in our Etsy Shop.

Available Now on Etsy.

Buy Now on Etsy

The pattern is for your eyes only. We encourage you to give away or sell your finished work as long as you credit yarnovations.com as the designer.

Caterpillar Pencil Case in Little Looms

We’ve designed an adorable caterpillar pencil case for Little Looms Magazine. Isn’t it sweet!

We love this little pin loom woven creature. It’s the little finishing details that make it so cute. And those are really easy to make because they are just bits of felt fabric glued to the assembled project. But, wow, do they give this insect so much charm.

The caterpillar pencil case measures approximately 9 1/2″ x 3″ x 3″. Keep reading to learn more about the pin loom weaving caterpillar pencil case.

Caterpillar Pencil Case in Little Looms

The Caterpillar Pencil Case made it’s debut in the Little Looms Fall 2022 issue. You can get the pattern by purchasing the digital issue of the magazine or becoming an all access member to Little Looms. Learn more at Little Looms website.

More about the Pin Loom Weaving Caterpillar Pencil Case

The caterpillar pencil case uses only 2 pin looms; a 4″ square and 2″x4″ rectangle. If you’ve needed an excuse to buy the 2″x4″ pin loom, than this is it! The materials list for this project are pretty minimal. Here’s what you’ll need to make the pin loom caterpillar pencil case:

  • Pin Loom Square: 4″
  • Pin Loom Rectangle: 2” x 4”
  • Needles: 6″ weaving needle, tapestry needle, sewing needle
  • YARNS: Lion Brand Yarns Vanna’s Choice (Acrylic, 170 yd/3.5 oz)
  • #180 Cranberry, 20 yd
  • #172 Kelly Green, 20 yd
  • #171 Fern, 30 yd
  • Zipper: green 8”
  • Washable marker
  • Fabric Glue
  • Straight Pins
  • Green Thread
  • Optional: fabric and thread for lining
  • Optional: Sewing machine

Caterpillar Pencil Case is Great for New Crafters

There are just a few techniques used to make the pencil case. If you’re new to crafting, than this is a great project to learn new skills.

First, the caterpillar body / the main portion of the bag, is made with a technique called pin loom weaving. The fabric is woven in plain weave which is the most basic form of weaving on a pin loom. You weave under one thread and over one thread across.

Second, there are embroidered French knots on the body to represent spots. Those are another great beginner friendly embroidery technique.

Third, is sewing a zipper into the project. This can be done by hand sewing a running stitch or back stitch. Both are sewing stitches everyone should have in their knowledge banks.

Fourth, and completely optional, is a lining. This can be hand sewn as well, but most people will pull out a sewing machine for this portion. Lining is added to the bag prior to attaching the zipper.

A lining is recommended because woven fabric has holes and it’s easy for additional holes and larger ones to be poked into it.

Little Looms 2017 Patterns

Two New Pin Loom Patterns

Two of my pin loom patterns appear in the 2017 Little Looms magazine by Handwoven. You are going to love them.

Pin Color Flow Rug

First, the Color Flow Rug. I call it Color Flow because the colors transition nicely due to the quadrant squares between the solid squares. Because you change colors during the warping and weaving process, part of the square is solid, and part of the square is a mixed color. The twisted cord tassels really finish off the rug nicely.

Pin Geo Waves Scarves

Second, the Geometric Waves Scarves. These striking scarves are actually just solid squares sewn with a dark color on one half and a light color on the other. The lines are all embroidered on. If you use wool, it can be felted. Just be sure to make it extra long as it will shrink in the felting process!

Check out these and more great patterns in the 2017 Little Looms magazine.

What are you weaving?

Pin Loom Woven Gift Bags

Weave your own gift bags!


img_3526

Christmas is four days away and I decided today that I just had to weave 8 little drawstring gift bags for family members! Shouldn’t be too hard with a toddler and preschooler around. Not to mention that there is paint involved. What could go wrong?

I love these bags because they can be personalized to match the recipient and can be made for any season or reason. The color of yarn and stencil do all the work!

What you need:

Yarn

4 inch pin loom (I use the Zoom Loom)

Stencil and paint brush

Paint and some form of paint tray

Scissors, yarn needle

How-to Make a Drawstring Gift Bag

Plain weave 8 four inch squares per gift bag. I sewed the squares together so they were 2 x 4, then folded it in half so it was 2 x 2 with the top open. I always sew on the inside and use the double overcast method. It seems to make the nicest looking join on the front (in my humble opinion) and is sturdy for holding things in the bag.

Next I made a twisted cord. (I started with about 16 feet of yarn, twisted it, folded it in half and let it twist on itself.) Then I turned the bag inside out, folded the top of the bag over the cord, and sewed it to the bag making sure not to sew through the cord. I centered the cord in the bag and tied a knot about eight inches from the bag and trimmed off the rest.

img_3525

I bought several stencils at the store making sure they were small enough to fit on a project 8 inches square. I turned the bag right side out, inserted a piece  of paper in the bag (so the paint wouldn’t soak through to the other side), and painted the desired scene. To give it extra pizzazz, I used a Sharpie marker to add shading.

img_3523


And voila, I was on my way to making the gift bags I needed. Excuse me now, I need to weave more squares for the rest of the gift bags!


Fantail Dishcloth and Crochet Market Bag

Dishcloth+ Series: May’s Fantail Dishcloth and Crochet Market Bag

Crochet Market Bag and Dishcloth

Whether you just want to learn the fantail stitch or are looking for a fun lacy project to crochet, the fantail dishcloth and market bag are two fun projects to make.

The fantail creates a dishie that’s both lacy yet solid that’s perfect for hand washing.

The crochet market bag was designed to be more solid at the base and lacy in the middle to both catch little items that work their way to the bottom of the bag and bulky items that need to stretch.

Dishie and Market Bag

The dishcloth and market bag are crocheted in Fibra Natura Good Earth distributed by Universal Yarn. This cotton linen blend is perfect for going from sink to washing machine and back again.

PDF Instant Download Available Now

The Dishcloth+ Series: Fantail Dishie and Market Bag Crochet Pattern is now available in our Etsy Shop.

Available Now on Etsy.

Buy Now on Etsy

Merry Handmade Christmas 2015

We hope you all had a holly jolly Christmas. This year I, Dana, crocheted a few gifts…I felted a purse for my mom, made some lovely catnip filled mice toys for my sister and sister-in-law (well, for their cats anyway), and I crocheted a skull purse for my twin sister. For the latter two crocheted gifts I followed patterns created by fellow designers on the free membership site Ravelry.

Crocheted Skull Granny Purse

This flat bag used nearly every inch of one skein of Lion Brand Vanna’s Glamour. I lined it and added a zipper. The handle is attached with a couple of buttons so the strap length is adjustable. The front and back panel are the same.

If you love skulls, there are a ton of great patterns on ravelry. I modified the Crochet Skull Scarf pattern by Karin Kaufmann. She modified a pattern from the Crochet Skull Shawl / Doskallesjal by Kungen Och Majkis.

My sister originally requested that I make the shawl…but I really wasn’t up to such a large project. A purse is something she can use year around. So I think my modified gift is a win/win.


Vote in Witchy Twins Face Off with Anne Geddes

Vote in the Twins Face Off Crochet Design Challenge with Anne Geddes Baby

For this Twins Face Off crochet challenge we used Anne Geddes Baby yarn. It’s up to you to choose, which crocheted Witch Accessory you like better. After you vote below, scroll down to enter the giveaway for your chance to win 4 skeins of Anne Geddes Baby from Red Heart and a copy of both crochet patterns.

Giveaway ends September 21, 2015 at midnight.

Twins Face Off Witch Hat and Scarf

Left: Witch Hat with Dangling Spider    Right: Extra Long Striped Scarf with skull and spider web applique. See more photos.

crochet witch accessories

The hat and scarf were designed this month to coordinate with some gloves and leg warmers that we crocheted earlier this year. See more photos of the Witch Way, This Way crochet pattern.

The vote is annonymous, so vote with confidence.

Vote

[poll id=”11″]

Enter Anne Geddes Baby Giveaway

US & Canada Only

a Rafflecopter giveaway

Vote on Baby Challenge and Giveaway

Vote on the Baby Design Challenge and
Enter the Bernat Softee Baby Yarn Giveaway

It’s up to you to choose, which baby set you like better. After you vote below, enter the giveaway for your chance to win the yarn used in this month’s challenge as well as the patterns for both baby sets.

Giveaway ends May 25, 2015 at midnight.

Vote on Twins Face Off Baby Sets

Left: Baby Pink Shelly Baby Set Right: Baby Blue HDC Faux Stockinette Baby Set

Below are more photos of the baby sets. You can see more photos in the shop: Baby Pink Shelly Baby Set and Baby Blue HDC Faux Stockinette Baby Set.

Pink Shell Baby Sweater Hat Booties

HDC Baby Sweater Hat Booties

It’s time for your vote – it’s annonymous…so vote with confidence!

Vote

[poll id=”7″]

Bernat Softee Baby Giveaway

USA and Canada Only

a Rafflecopter giveaway

Pink Baby Shelly Baby Pattern Set on Etsy.

Baby Blue Pattern Set on Etsy.

Behind the Scenes: Chutes and Lattice

chutes and lattice with twist and tuckBehind the Scenes:
Chutes and Lattice Scarf

Inspiration comes from lots of different places. In the case of the Chutes and Lattice Scarf, it was a combination of having a beautiful yarn on hand at a time when I was browsing through a stitch dictionary.

First: The Yarn

I attended the Estes Park Wool Festival a few years ago with my friend Jean (from Desert Rose Designs). There were lots of beautiful yarns at the show, and I was overwhelmed by it all (what did I know…I crocheted with acrylic most of the time). Jean had a lot of great things to say about the yarn we saw in the booth of Brooks Farm. So I decided to buy a skein. I selected Acero because I loved the rich color, the soft fiber (wool/silk/viscose blend) and that one skein had 420 yards. Of course, I had no idea what I was going to do with it!

Second: The Stitch Dictionary

donna kooler's encyclopedia of crochetAbout a year after attending the wool festival, I found myself browsing through Donna Kooler’s Encyclopedia of Crochet. I was inspired by a lot of the designs in there, particularly those in the “Lace Patterns” section.

So, out came the Acero yarn. I began crocheting a few swatches and soon realized that my projects didn’t always look like the pictures in the book. I learned a valuable lesson: the material the yarn is made of will impact the look, drape and feel of the finished project! I was bound to stumble upon this widely known truth sometime. I’m glad it was when I had a beautiful yarn and a great book to refer to.

Third: The Scarf

To me, the “Chain Lace” on page 149 of Donna Kooler’s book looked like flowers or chutes. Although I loved it, I didn’t want that pattern to make up the entire scarf. So I added some lattice; open ladder like chain work which I sprinkled throughout and added to the ends. And since the chutes are directional, I created the scarf in two panels.

I loved it. My sister and mom did, too. My mom has even hinted that she’d love it if I’d accidently leave it at her house when I come visit. Since she’s a crocheter herself, I think I’ll just leave her the pattern!

Coral BloomsFourth: Publication

I was so happy with the scarf, I decided to submit it to Love of Crochet magazine and they accepted it! They requested a lighter color yarn, so I recrocheted it in Knit Picks Gloss in Guava (color discontinued). Renamed “Coral Blooms”, my scarf appeared in the Spring 2014 issue of the magazine.

Fifth: Self Publishing

The magazine had exclusive rights to the design for several months, meaning I couldn’t sell it on my website (or blog or share photos of the design I loved so much).

Now I can…thus my Behind the Scene’s article. One of the fun things about self publishing is the ability to show more photos. Earlier this week I posted the pattern in the shop and shared lots of styling options on the blog, which were modeled by my friend Lorien (from Lady Lorien Designs).

This is a really fun lacy design. If you make one for yourself, please share photos on Ravelry! We’d love it.

Available on Etsy: Here

Behind the Scenes: Bohemian Handbag

Behind the Scenes: Bohemian Handbag

The Bohemian Handbag won by a very healthy margin in the Lion Brand sponsored Twins Face Off purse design challenge in April. I, Dana, am thrilled that so many people liked it.

Bohemian Handbag Collection

I have a confession to make, this simple handbag was not one of those projects that come to fruition in one sitting. In fact, I talked about it with the ladies in my crochet group, looked at projects online, and visualized a myriad of designs before settling on this basic construction.

There were several types of bags I considered for the challenge.

  • 1st I was contemplating a backpack, something cutesy that a child might wear. I was even calculating how to incorporate a small padded pocket to store a computer tablet.
  • 2nd I decided on a stitch sampler bag with lots of different pieces sewn together almost like a free form project. I even worked up a small swatch with the star stitch (which looked beautiful, by the way)
  • 3rd I began working on a round bag with the spiral that would be on the front and back panel. I envisioned a long shoulder strap and a gusset with a zipper.
  • Bohemian Handbag Crochet PatternFinally, after carefully frogging the previous designs, I settled on a spiral based bag with two skeins of yarn that would chase each other around the bag. I decided to let the color be the main feature of the bag and double crocheted in the round. Once the main shape of the bag was finalized, items like the handle and flower closure quickly took shape.

This entire project makes me chuckle becaues I rarely use a purse. Those rare instances where I do use a purse, it’s generally so small that it only fits my phone, wallet and car keys. That being said, this challenge was quite fun. I enjoyed both the project category and the vibrant Landscapes yarn.

Pattern available on Etsy: Here.