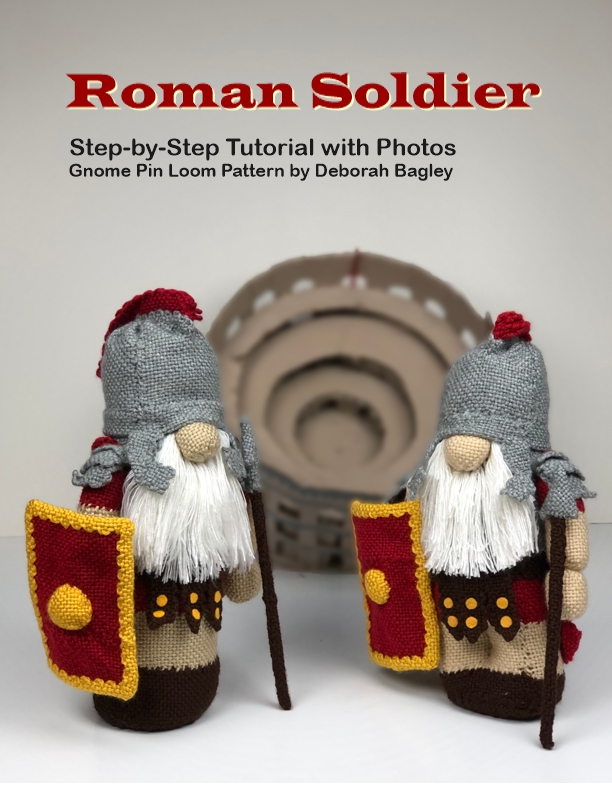
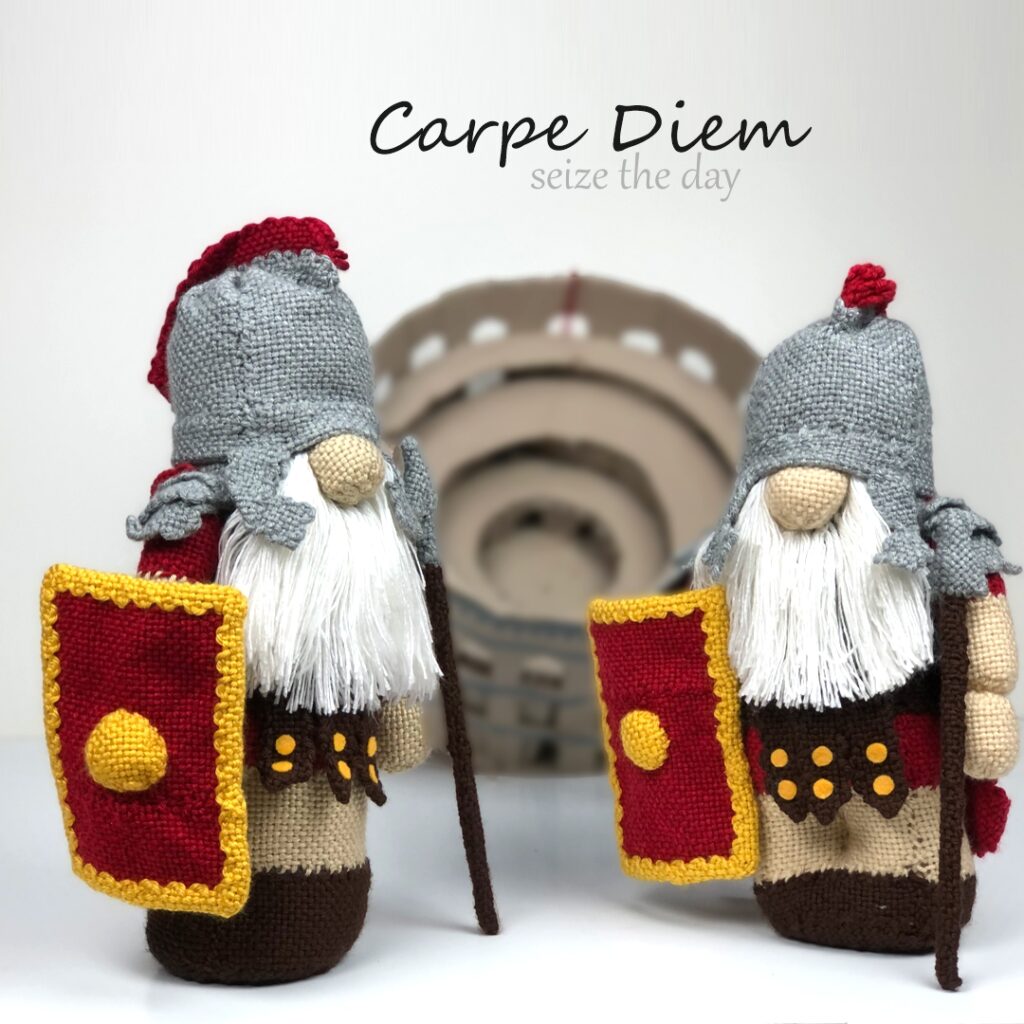
Monster Pin Loom Pattern

Make a monster with a 4″ pin loom square following this tutorial with photos.

Pin Loom Monsters Pattern for 4″ Squares

These cute and cuddly monsters were made with only a 4″ pin loom square. They are super easy and really fun to make. Learn to make textured squares and how to tuck and fold squares to make ears, arms and feet.

  • Pajama Keeper – the mouth is left open so kids can tuck their PJ’s inside.
  • Pillow Pal – the monster is stuffed with fiberfill and the mouth is sewn closed.
  • Purse – sew a zipper in place of the mouth and use this monster as a purse. Pattern includes instructions for a crocheted shoulder strap.

Monster Pin Loom Pattern Available on Etsy

Get your copy of the monster pin loom pattern pdf from our Etsy Shop.

Available now on Etsy.

Shop our Etsy Shop

Monster Pattern: What’s Included

This is a tutorial with photos to make the trio of monsters pictured here. The pattern includes:

  • Step-by-by-Step Instructions
  • Pattern for 2 textured woven squares with photos
  • Step-by-Step Photos for shaping the ears and arms
  • Crochet instructions for eyes, teeth and purse handles (or use felt)
  • 20+ photos
  • 14 pages

Share the Love, Pin a Picture to Pinterest

Share the love of pin loom projects by pinning the above photo to pinterest.

More about the Monsters Pin Loom Pattern PDF

As we mentioned, the monsters are made with only one loom: a 4″ pin loom square. We used medium worsted weight yarn, specifically: Red Heart Soft and eyelash yarn. The textured squares use two colors on each square. The furry head also uses two different kinds of yarn. The ears, arms and legs are woven in plain weave with one color yarn.

The pattern is surprisingly easy to make. We include step-by-step photos for several steps…like the ears and how we warped the loom for the special squares. And of course, each step is written out from start to finish.

There is a tiny bit of crochet. But you can make the eyes and teeth with felt if you prefer.

Monster Pin Loom Pattern Available on Etsy

Get your copy of the monster pin loom pattern pdf from our Etsy Shop.

Available now on Etsy.

Shop our Etsy Shop

Frankenstein’s Monster Clutch

We’re celebrating Halloween all month long with this Frankenstein’s Monster clutch.

Designed to stand on it’s own, this blue eyed green monster bag has a zippered top to hold all your valuables safe inside. It can be used as a purse, pencil case, make-up bag and more. The gusset is narrow at the top by the zipper and wide at the base which allows it to stand. Make with or without a purse strap.

The Frankenstein’s Monster zipper pouch also features a bolt zipper pull. The sides and bottom are reinforced with heavy duty stabilizer so it flexible yet maintains it’s clutch shape.

Measurements: Approximately 9 ½” wide x 5 ½” tall x 2 ½” deep at base

Frankenstein’s Monster Crochet Pattern on Etsy

The Frankenstein’s Monster crochet pattern is available in our etsy shop.

Available now on Etsy.

Buy the pattern on etsy

More About The Frankenstein’s Monster Clutch

We call it Frankenstein’s Monster because of the scar on the forehead and bolt on the zipper pull. But we’ve also had people call it the Incredible Hulk or a Zombie. We can go with that, too.

The Frankenstein’s Monster Purse Crochet Pattern includes:

  • Written Instructions
  • 10 Pages
  • 10 Photos

The bag is made with 2 eyeball granny squares on the front panel and 2 plain granny squares on the back. A gusset is crocheted separately and joined to the front and back panels. The hair is crocheted at the end with regular crochet and spike stitches. Stabilizer, zipper, lining and optional handle give it a nice crisp look and make it super practical.

Share the Love, Pin to Pinterest

Share the love of Halloween by pinning one of our pictures to Pinterest.

Materials List for Frankenstein’s Monster Purse

We used Vanna’s choice yarn. But any medium worsted weight yarn should work. For the lining, you’ll want to measure your own bag as you may need more or less fabric and stabilizer.

  • Yarn:   Lion Brand Yarns: Vanna’s Choice – Medium Worsted Weight (4)
  • 100% acrylic (170 yds/156 m; 3.5 oz/100 g) 1 ball each:
  • #860 153 Black, C1
  • #860 108 Dusty Blue, C2
  • #860 100 White, C3
  • #860 171 Fern, C4
  • #860 113 Scarlet, C5
  • #860-149 Silver Grey, C6
  • Fabric: black for lining 15”x14” or size needed for your finished bag.
  • Stabilizer: Extra Firm 15”x14” or size needed for your finished bag.
  • Crochet Hook: H/8/5.00mm
  • Needle:  yarn needle for sewing
  • Needle and Thread: black
  • Stitch Markers
  • Straight Pins
  • Zipper: 10” black

Frankenstein’s Monster Crochet Pattern on Etsy

The Frankenstein’s Monster crochet pattern is available in our etsy shop.

Available now on Etsy.

Buy the pattern on etsy

Denim and Fabric Basket Sewing Pattern Collection

Sew your own gorgeous basket with this fun and easy Denim Basket sewing pattern PDF.

It’s a beginner friendly sewing pattern with step-by-step instructions and photos. Traceable templates are included for a denim basket (or fabric basket) that measures 10″ wide x 6″ long x 6 1/2″ tall.

About The Denim Basket (Fabric Basket) Pattern

This denim basket sewing pattern is FULL of helpful information making it great for new and experienced sewists alike. Here’s what’s in the basket sewing pattern:

  • 1 basket pattern: 10″ wide x 6″ long x 6 1/2″ tall
  • 2 lining options: sewn in or sewn separate
  • 3 handle options
  • 6 fabric designs
  • Traceable templates
  • 40 pages
  • 70+ photos
  • Beginner Friendly
  • Step-by-Step instructions

You can build your own fabric design, or sew a basket with a solid piece of material.

denim basket and fabric basket options in this beginner friendly sewing pattern

What material do you need to make a denim basket?

You only need 1 pair of children’s jeans to make a denim basket. However, we used 5 pairs for the chevron because we wanted different shades of blues and black material. You can use any denim you have on hand to make the denim baskets. If you want a basket with a pocket on the front, we recommend children’s jeans as the small size pocket is a perfect fit. Don’t have denim, check out your local second hand store for a pair or two.

What material do you need to make a fabric basket?

If you want to sew a basket from fabric, you have even more options. You can buy new fabric or use material you have on hand such as clothing and bed linens. This is a great time to upcycle fabrics that are worn or neglected or have a stain or two (just cut around those bad spots). The second hand store is also a great resource because you can browse all the clothing departments (children, men’s women’s) as well as the linens. We recommend cotton fibers for new sewists.

How much material is needed to sew a denim basket?

The denim basket and fabric basket each require 3 layers of fabric.

  • Layer 1: The outside fabric (such as denim or cotton)
    (2) pieces at least 12″ x 17″
  • Layer 2: The inside lining fabric (such as muslin or cotton)
    (2) pieces at least 13″ x 17″
  • Layer 3: The stabilizer (ultra firm – fusible or non-fusible)
    (1) piece at least 20″ x 24″

You’ll also need thread to match your fabric.

The Denim Basket / Fabric Basket Sewing Pattern PDF

You’ll also need the Denim Basket Sewing Pattern. It’s available in our Etsy Shop.

Now available on Etsy.

Buy the pattern on etsy

1 Basket Pattern – 6 Fabric Designs

Even though there is only 1 size basket in this pattern, we show you how to create 6 unique fabric designs. So it’s really 6 patterns in 1!

Basket measures: 10″ wide x 6″ long x 6 1/2″ tall.

The 6 fabric designs included in the denim basket sewing pattern are as follows. Keep in mind that this is in addition to a solid fabric basket design:

  • Chevron
  • Quadrant
  • Pocket Front
  • Stripes
  • Wide Stripe
  • Scrappy
Denim Basket with pocket used as baby diaper basket

Uses for Denim Basket (Fabric Basket)

This 10″ x 6″ basket size is really quite convenient. It will help you get organized and help your house feel neat and tidy. We’ve used these baskets as:

  • Baby Diaper Basket
  • Baby Shower Gift
  • Paperless Towel Basket
  • Book Storage
  • Bathroom Storage
  • Christmas Basket
  • Laundry Room Storage Basket
  • College Dorm Room Storage Basket
  • And more…

Pin Our Picture to Pinterest

Share the love. Pin our pictures to Pinterest.

Buy the Denim Basket and Fabric Basket Sewing Pattern on Etsy.

We had a lot of fun sewing basket after basket. You will, too. The Denim Basket Sewing Pattern is available in our Etsy Shop.

Available now on Etsy.

Buy the pattern on etsy

Shells and Lace Crochet Baby Blanket Set

The Shells and Lace crochet baby blanket pattern set is surprisingly quick to stitch, and it comes with 3 accessories making it a great baby shower gift. This pattern set includes a baby blanket, sweater, hat and booties for newborns.

The baby blanket measures 27″ wide x 36″ tall.

The Shells and Lace pattern looks great in so many colors. We’ve stitched one in pink and one in blue. They are so sweet! The main stitch of the baby blanket is corner-to-corner with a twist. The edging is stitched in 5 rounds and it adds a gorgeous finish to the solid center panel.

Corner to Corner – C2C In Rows!

Did I mention this is a fun pattern to crochet? Sooo much fun.

The main pattern of the baby blanket is like corner-to-corner but better! This is worked in rows without any decreases or increases. In fact, it has a one row repeat. It’s made in a rectangle rather than from corner to corner. No more worrying about when to make a corner. This C2C stitch is worked back and forth until you have the length needed.

The blanket is a great project to work on while watching tv or at a ball game, because you just need to glance down every so often to work a cluster.

Shells and Lace includes a Newborn Baby Sweater

Yep, you read that right. The Shells and Lace crochet pattern includes a newborn baby sweater. It coordinates with the baby blanket with a bit of corner-to-corner stitching.

The collar has a bit of the crochet shell pattern found on the edging of the baby blanket, too.

newborn baby sweater crochet pattern with some corner-to-corner stitch

Shells and Lace includes Baby Booties

Oh yeah. The fun continues with adorable newborn baby booties. The main body of the baby booties is single crochet, but the cuffs are similar to the shells edging the Shells and Lace Baby Blanket Pattern.

We’ve attached cute pink buttons, but we’ve also seen these dressed up with little daisy buttons, too. We recommend that you crochet the booties then take them to the store to select a pair of sweet and whimsical buttons.

baby booties with shell cuff crochet pattern

Shells and Lace includes Newborn Hat

The set wouldn’t be complete without a baby hat! This newborn beanie is stitched in half double crochet and edged with corner-to-corner stitch. Yep, corner-to-corner makes a great edging! Who knew?

newborn baby hat crochet pattern

Pin to Pinterest

Share the love, pin our pictures to pinterest.

4 in 1 Crochet Newborn Set Available on Etsy

The Shells and Lace Baby Blanket Set crochet pattern is available in our Etsy Shop.

Available now on Etsy.

Buy the pattern on etsy

4 in 1 Crochet Pattern includes:

  • Baby Blanket: 27″ x 36″
  • Newborn Baby Hat
  • Newborn Sweater
  • Newborn Baby Booties

More about the Shells and Lace Baby Set

Shells and Lace Crochet Baby Set was made with a size 3 light weight yarn.

  • Yarn: Bernat Softee Baby: Light Weight (3) Soft Red

Stitched in USA abbreviations:

  • ch = chain
  • dc = double crochet
  • dec = decrease
  • hdc = half double crochet
  • inc = increase
  • picot = ch 3, sl st in 3rd ch from hook
  • rnd = round; work in the round
  • sc = single crochet
  • sc inc = single crochet increase; two single crochet in the same stitch
  • sl st = slip stitch
  • st(s) = stitch(es)
  • trc = treble / triple crochet
  • *instructions* = repeat the instructions written between the ** the number of times indicated after the second *
  • [instructions] = repeat the instructions written between the [ ] the number of times indicated after the ]

About the Shells and Lace Crochet Pattern

The pattern was written as part of the Twins Face Off in 2015 where Deborah and Dana each made a baby set and asked people to vote for their favorite. The pattern has not been modified.

The pattern is not written as a beginner pattern. There’s nothing complicated, but the pattern is a bit abbreviated which a beginner may find confusing. We assume one stitch will be worked in each stitch and only specify if multiple stitches are worked in the same space or stitch. For example:

  • “8 hdc, 3 hdc in next st”
  • This means to hdc in each of the next 8 sts, then 3 hdc in the next st.

This abbreviated version of pattern writing allows you to read each line more quickly and condenses the pattern.

Get Shells and Lace Baby Set on Etsy

Purchase your copy of Shells and Lace Baby Blanket Set crochet pattern in our Etsy Shop.

Available now on Etsy.

Buy the pattern on etsy

The pattern is for your eyes only. We give you permission to give away and sell your finished projects with credit to Yarnovations.com as pattern designers.

Frankenstein’s Monster Gnome Pattern

Frankenstein’s Monster just got a whole lot cuter. And now you can pin loom weave your own gnome. Here he is sporting a Frankenstein’s Monster hat and a trick or treat bag. He’s all ready for Halloween and a spooky night of trick or treating.

The PDF pattern is a step-by-step guide to pin loom weaving your own Frankenstein’s Monster and Pumpkin Trick or Treat Bag. Every shape is woven in plain weave. He measures 10″ tall x 7″ wide x 4 1/2″ deep.

Here’s what’s included in the Frankenstein’s Monster Gnome Pin Loom Pattern:

  • Gnome with Frankenstein’s Monster Hat
  • Pumpkin Trick or Treat Bag
  • 14 Pages
  • 35+ Color Photos and Charts
  • Detail Written Step-by-Step Instructions
  • Complete Materials List

Purchase Frankenstein’s Monster Pin Loom Pattern

Frankenstein’s Monster Pin Loom Pattern is now available to purchase in our Etsy Shop.

Available Now on Etsy.

Mary Shelley introduced Frankenstein’s Monster in her novel Frankenstein in 1818. The concept of electricity to spark life into Frankenstein’s monster was introduced later in James Whale’s 1931 film. The main plot remains consistent, but modifications are made with each adaptation of the story…and now he’s been changed once again. This time Frankenstein’s Monster is a Halloween costume and this gnome is hoping to gather a ton of candy in his oversize pumpkin trick or treat bag.

Pin These Frankenstein’s Monster Photos To Pinterest

Share the Love, pin one of these Photos to Pinterest

The Step-by-Step tutorial makes this gnome really easy to make. If you can pin loom weave, then you can make this gnome. He makes for a great handmade Halloween decoration. But…he’s also fantastic gift for those friends and family members who are fans of horror books and films.

Here’s what we used to construct our own pin loom woven Frankenstein’s Monster:

  • Pin Loom Squares: 4” and 1”
  • Pin Loom Rectangle: 2” x 4”
  • Pin Loom Triangle: 2”
  • Yarn:   Red Heart: Soft – Medium (4)
  •             GRAPE #3729 – 100 yds
  •             BLACK #4614 – 40 yds
  •             WHEAT #9388 – 25 yds
  •             GUACAMOLE #4420 – 20 yds
  •             LIGHT GREY HEATHER #9440 – 10 yds
  •             CORAL #9251 – 16 yds
  •             WHITE #4600 – 120 yds
  • Needle:  6” needle for weaving and yarn needle for sewing
  • Stuffing
  • Felt: Black, remnant
  • Button: (2) 5/8”
  • Beans: to weigh the gnome down
  • Fabric Marker/Chalk: – white, dark
  • Straight Pins – (optional)
  • Tacky or Fabric Glue
  • Pet Comb – metal (optional)
  • Steamer (optional)

Buy the PDF Pattern for Frankenstein’s Monster

Instant download for Frankenstein’s Monster Gnome Pin Loom Pattern is available in our Etsy Shop.

Available Now on Etsy.

Buy Now on Etsy

Toy Soldier Gnome Pin Loom Pattern

Make your own little drummer boy with this Toy Soldier Pin Loom Pattern. We’ll show step-by-step how easy it is to turn yarn into a nutcracker gnome with this PDF download. The toy was made with only 4 pin looms.

It’s quite adorable at 11 1/2″ tall. The finished measurements are approximately 6 1/2″ wide x 4 1/2″ deep x 11 1/2″ tall.

When you look closely at the drummer boy, you’ll notice extra little scallops on the sleeves and shoulders, etc. Lucky for us, this is a natural feature if pin loom shapes. It’s little “cheats” like that which give the illusion of grandeur to the toy soldier.

What’s in the Toy Soldier Gnome Pin Loom Pattern

This step-by-step tutorial for the Toy Soldier Gnome includes all of the following:

  • Toy Soldier Gnome Instructions
  • Drum Instructions
  • Step-by-Step Written Instructions
  • 17 Pages
  • 50+ Color Photos and Charts
  • Complete Materials List
  • Helpful Tips

Toy Soldier Gnome Pattern Available on Etsy

The Toy Soldier Gnome Pin Loom Pattern is available in our Etsy Shop.

Available now on Etsy.

Buy Now on Etsy

Pin the Toy Soldier Gnome to Pinterest

Share the love, pin these pictures to Pinterest.

More about the Toy Soldier Gnome Pin Loom Pattern

We rate the Toy Soldier Gnome as intermediate, but it’s very doable by the confident beginner. This gnome is made by folding, rolling and tucking woven shapes. The photos will show you step-by-step how to do that.

Here are the supplies you’ll need to make your own Nutcracker Gnome.

  • Pin Loom Squares: 2” and 4”
  • Pin Loom Rectangles:  1”x4” and 2”x4”
  • Yarn:   Caron Simply Soft –
  • Medium Worsted Weight (4)
  •             BLACK #727 – 55 yds
  •             WHITE #701 – 55 yds
  •             BONE #9388 – 15 yds
  •             HARVEST RED #763 – 75 yds
  •             OCEAN #759 – 40 yds
  •             GOLD #782 – 50 yds
  •             TAUPE #783 – 8 yds
  • Needle:  6” needle for weaving and yarn needle for sewing
  • Stuffing
  • Fringe Twister or premade gold cord – 14”
  • Beans: to weigh the gnome down
  • Fabric Marker: – white, dark, or chalk
  • Pet comb: – metal
  • Steamer (optional)
  • Starch or Hair Spray (optional)

We’ve added a little bonus at the end for turning the drum into a Christmas ornament. This little drummer boy would make a great decoration for a table or fireplace mantel. He’s also a great gift to make for your friends and family who love the Nutcracker ballet or have a passion for drums.

Get your copy of the Toy Soldier Gnome Pin Loom Pattern today.

Buy Now on Etsy

Bear Pillow Sewing Pattern

Looking for a bear sewing pattern? Look no further. This step-by-step tutorial will guide you through each step of turning fabric into a cute and cuddly bear pillow. Mix and match your fabric to make your own one of a kind bear.

This sewing project is so much fun, and easy, that we kept coming up with more bears to make. This tutorial is great for making all kinds of bears such as: Asiatic black bear (moon bear), brown bear (including grizzly), giant panda, North American black bear, polar bear, sloth bear, Andean bear (spectacled), and sun bear!

Not only that, this bear pillow is festive, too. One can be made for various holidays by changing out the fabric on the scarf. These are great for new baby, nursery and baby shower gifts, Christmas, Halloween, and going away to college gifts. They also make great gifts for boys and gifts for girls, memory bears, gifts for bear enthusiasts and bears for those who love to cuddle.

They can also be a heartfelt and thoughtful gift for someone that has lost a loved one. Sew the bear with a shirt that belonged to their special person and they can hug it in times of sorrow.

The bear sewing pattern includes:

  • Bear Pillow Pal Rectangular Pillow Pattern
  • Panda Bear Instructions
  • Bamboo Instructions
  • Step-by-Step Written Instructions
  • 25+ Color Photos
  • 10 Printable Template Pages (8.5″x11″)
  • Complete Materials List
  • Helpful Tips
  • Information About Sewing Machine Settings
  • Links to helpful videos

The finished measurements of the bear pillow are approximately 16″ wide x 3 1/2″ deep x 12″ tall. The templates are drawn at 100% and can be printed on 8.5″ x 11″ paper. So you’ll need to cut out the templates and tape pieces together.

Bear Pillow Available on Etsy

Our bear pillow sewing pattern is available in our Etsy Shop.

Available now on Etsy.

Buy Now on Etsy

More About the Bear Pillow Pattern

Bonus: Panda and Bamboo are included!

This bear pillow pattern can be sewn in an afternoon if you have all the supplies. Here’s what you’ll need to sew your own bear pillow:

  • Pattern Pieces: Template included with pattern
  • Fabric: Head Color: 20” x 10”
  • Snout Color: 12” x 5”
  • Scarf Color: 25” x 12”
  • Bamboo: 25” x 4” per stalk
  • Felt: Black – 1 sheet (10” x 5”)
  • Thread: To match felt and fabric
  • Straight Pins and Needle
  • Stuffing: Approximately 8-10 oz of Poly-fil or 12”x16” pillow form
  • Scissors
  • Sewing Machine
  • Pencil, Pen or Chaulk

Pin a Picture to Pinterest

Share the love, pin these pictures to Pinterest.

Even More about the Bear Sewing Pattern

This is a great pattern for sewists of all abilities from the brand new to the seasoned enthusiast. The tutorial includes information about how to set up your sewing machine and different stitches to use. Three different stitches were used on the bear because sometimes the fabric is sewn on the right side and sometimes on the wrong side.

The pattern will take you step-by-step with written instructions and helpful color photos. Helpful tips and included as well as links to videos that will show you different sewing techniques.

So, pick out your fabric and head over to Etsy for your copy of the Bear Pillow Sewing Pattern.

This pattern is for your eyes only. We encourage you to give away or sell your finished projects and ask that you mention Yarnovations.com as designer. Thanks.

Get your copy of the Bear Pillow Sewing Pattern on Etsy.

Buy Now on Etsy

Viking Gnome Pin Loom Pattern

Make a Viking Gnome stuffed toy with yarn and pin looms! This little plushie is 12″ tall to the top of the horns. He’s surprisingly easy to make. The step-by-step tutorial will show you how to tuck, roll, pinch and cinch pin loom woven squares and rectangles to create this iconic Viking gnome.

There are a lot of little details that transform a simple gnome into a Viking. Most notable is the horned hat. What makes the “ironwork” so realistic is the two colors of “metal” yarn as well as the rivets that are made from felt. The bright orange braided beard is also a can’t-miss detail that makes this tough little Viking so adorable. The axe and shield complete the iconic image of a Viking.

Here’s what’s in the Viking Gnome Pin Loom Pattern:

  • 45+ Color Photos and Charts
  • 14 Pages
  • Step-by-Step written instructions
  • Complete materials list
  • Helpful tips

Viking Gnome Pattern Available on Etsy

This Viking Gnome Pin Loom Pattern is available for purchase in our Etsy Shop.

Available on Etsy.

Buy Now on Etsy

Pin This Viking Gnome to Pinterest

Share the love; pin one of these photos to Pinterest.

More About the Viking Gnome Pin Loom Pattern

This Viking Gnome Pattern, like our other gnome patterns, begins with a helpful chart listing the total number of pin loom shapes you’ll need for the project. This allows you to sit and weave all the squares and rectangles before you begin. Of course, you can weave them as you need them, or weave them all prior to beginning assembly.

There are two very small sections of crochet in this project. Single crochet (US terms) is used in both areas. The grey at the ends of the horns are crocheted, this is where the horn meets the helmet. The edge of the shield is also crocheted. This joins two pieces together and creates and “ironwork” edge.

What You’ll Need to Make the Viking Gnome

Here is the complete list of everything you’ll need to make the Viking Gnome. This list is also in the PDF Pattern.

  • Pin Loom Squares: 4” and 2”
  • Pin Loom Rectangles: 2” x 4” and 1” x 4”
  • Yarn:   Lion Brand: Basic Stitch – Medium (4)
  •             OLIVE #132 – 95 yds
  •             ECRU #098C – 25 yds
  •             SILVER HEATHER #404J – 35 yds
  •             CHARCOAL HEATHER #403J – 25 yds
  •             ALMOND #121L – 22 yds
  •             PUMPKIN #133A – 50 yds
  •             Lion Brand: Heartland – Medium (4)
  •             SEQUOIA #126U – 30 yds
  • Needle:  6” needle for weaving and
  •                yarn needle for sewing
  • Stuffing
  • Felt: Grey, 1” x 3”
  • Beans: to weigh the gnome down
  • Crochet Hook: – size G (optional)
  • Fabric Marker: – white, dark
  • Straight Pins
  • Tacky or Fabric GlueSteamer (optional

We wish your Viking gnome much success in his conquests and you in yours.

Buy the Viking gnome pin loom pattern on our Etsy shop.

Buy Now on Etsy

Football Fan Gnome Pin Loom Pattern

Weave a gnome mascot for your favorite football team. He’s so cute, your friends and family may want one, too! No worries, because this football fan gnome is really easy to make. The PDF step-by-step tutorial will show you how.

For example, the little football that the gnome is holding is made from a 2″x4″ rectangle. We have 4 photos that show you how to fold, tuck and sew it into the iconic football shape.

We provide helpful instructions for making certain details really pop. For instance, the beard is made with yarn that has been brushed with a metal cat comb to separate strands. Then steam ironed to straighten. It’s the little details that make this gnome really shine.

What’s included in the Football Fan Gnome Pin Loom pattern:

  • Gnome with Football Hat and Football
  • 25 Color photos and charts
  • Complete step-by-step written instructions
  • 11 Pages
  • Helpful Tips
  • Complete materials list

Football Fan Gnome Pin Loom Pattern Available on Etsy

The Football Fan Gnome Pin Loom Pattern is available in our Etsy Shop.

Available now on Etsy.

Buy Now on Etsy

More about the Football Fan Gnome

The materials needed to make your football fan gnome is surprisingly small. Some pin looms, yarn and stuffing are the main supplies. Specifically, you’ll need 4 pin looms. Here’s the complete list:

  • Pin Looms:     
  • Squares: 2” and 4”
  • Rectangles:  1” x 4” and 2” x 4”
  • Yarn:   Red Heart: Soft – Medium Worsted Weight (4)
  • BLACK #4614 – 95 yds
  • OFF WHITE #4601 – 55 yds
  • WHEAT #9388 – 15 yds
  • TANGERINE #4422 – 18 yds
  • TOAST #1882 – 75 yds
  • Needle:  6” needle for weaving and yarn needle for sewing
  • Stuffing
  • Beans: to weigh the gnome down
  • Fabric Marker: – white, dark
  • Pet comb: – metal
  • Steamer (optional)

Pin This to Pinterest

Share the Love: pin one of our images to Pinterest.

Great for Beginners

As we’ve mentioned, this is a great pattern for new weavers and those wanting to make toys for the first time. And it’s so cute, experienced weavers will enjoy making them, too. So, if you’re brand new to pin loom weaving, welcome!

The best way to get started is Etsy and YouTube. There are many shops that sell pin looms in all the sizes we use here. YouTube will show you how to weave and, if you’re so inclined, will show you how to make your own looms!

Here’s to playing a good game and being a super fan!

Buy the Football Fan Gnome Pin Loom Pattern in our Etsy Stop.

Buy Now on Etsy

Hammerhead Shark Pin Loom Pattern

Don’t wait for shark week to pin loom weave your own hammerhead shark stuffed animal! These pups are so fun and super adorable at only 10″ long. Real pups are about 24″ long when born, so these are about half the size.

Not only is this hammerhead shark adorable, we’ve made it really easy for you to make your own because we’ve created a step-by-step tutorial with lots of great photos and easy to follow directions.

What’s in the hammerhead shark pin loom PDF pattern tutorial?

  • Step-by-Step Written Instructions
  • 30 Color Photos
  • 7 Pages
  • Helpful Tips
  • Complete Materials List

Hammerhead Shark Pattern on Etsy

We’ve made the Hammerhead Shark Pin Loom Pattern available in our Etsy Shop.

Available now on Etsy.

Buy Now on Etsy

Share on Pinteret

Share the love, pin this photo to Pinterest.

In the photo above, the hammerhead shark is sitting on a diorama of coral. The entire coral reef is made from pin loom woven shapes. Unfortunately, there is no pattern at this time. There is a Starfish Pin Loom Pattern in our Etsy shop if you are looking for other sea creatures.

What You’ll Need to Weave a Hammerhead Shark

The materials list is surprisingly small for this hammerhead shark stuffed animal. In fact, it uses only 73 yards of yarn total! Here’s the complete list.

  • Pin Looms:   Squares: 1”, 2”, and 4”; (1” square loom is optional)
  •          Rectangles: 2” x 4” and 2” x 6”,
  •          Triangle: 2”
  • Yarn:   Lion Brand: Basic Stitch – Medium Worsted Weight (4)
  •             ECRU #098C – 25 yds
  •             SILVER HEATHER #404J – 45 yds
  •             CHARCOAL HEATHER #403J – 3 yds
  • Needle:  6” needle for weaving and
  •                yarn needle for sewing
  • Safety eyes (2) 8 mm
  • Stuffing

This hammerhead shark measures approximately 10″ long x 5 1/2″ wide x 3″ tall.

As you can see in the picture above, we’ve woven one hammerhead shark with all the fins a real hammerhead shark has. The other has fewer fins. But we think you’ll agree, both versions are super cute.

The Hammerhead Shark Pin Loom Pattern is available in our Etsy shop.

Buy Now on Etsy