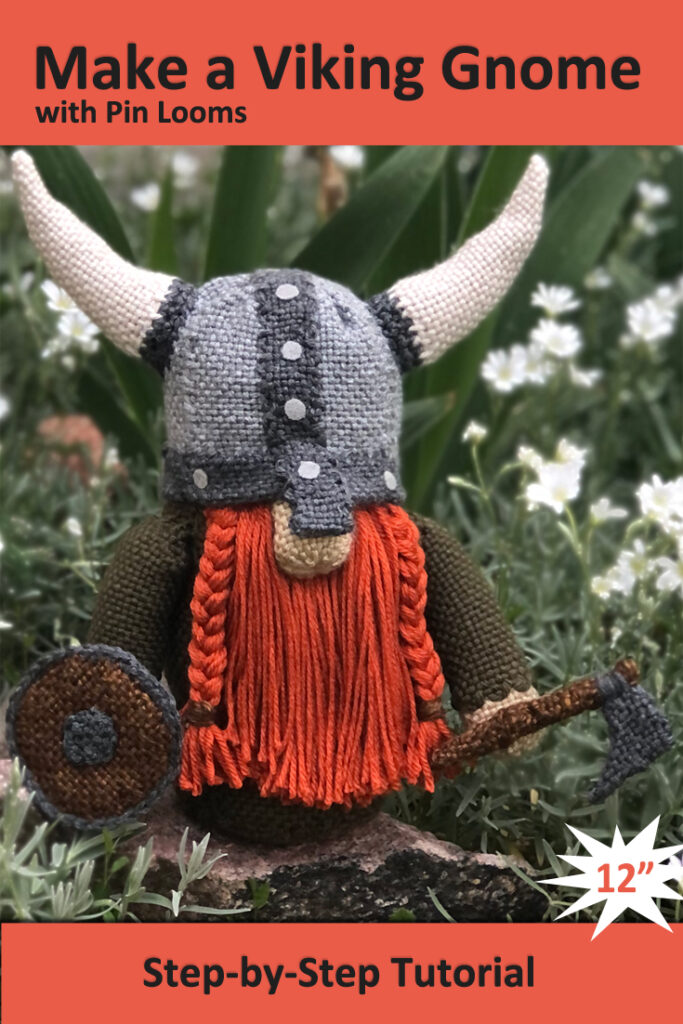
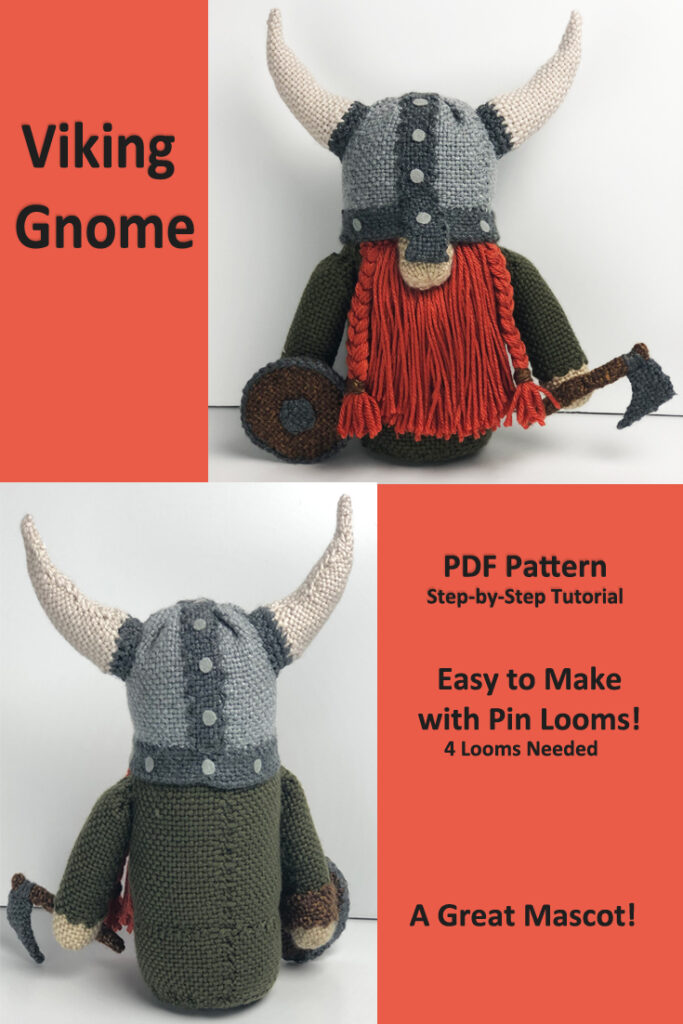
Snake Sewing Pattern

Looking for a fun toy for the kids? Snakes are a blast to play with and they look great in a wide variety of fabric! This step-by-step sewing tutorial has printable templates to make a 21″ long snake. What makes this particular pattern unique is the eye hood. Some snakes have what appears to be a brow above their eyes…so we’ve added that feature to this pattern. It definitely gives this serpent an aura of invincibility.

The safety eyes used can make a big difference in how “sinister” your snake will look. We used various colors and sizes of safety eyes to demonstrate how that one little detail will impact the look of your stuffed animal.

What’s in the Snake Sewing Pattern?

This is a step-by-step tutorial with printable template. The template is at 100% scale so you’ll tape together pieces from 3 pages to create the 21″ long snake top and another 3 pages to create the bottom. Here’s what’s in the PDF pattern.

  • Step-by-step written instructions
  • 15 color photos
  • Template printable on 8 1/2″ x 11 paper
  • Materials List
  • Helpful tips
  • Links to sewing videos

Snake Sewing Pattern Available on Etsy

This snake sewing pattern is available in our Etsy Shop.

Available now on Etsy.

Etsy Shop

Pin This Snake Pattern to Pinterest

Share the love, pin this picture to Pinterest.

What Will You Need to Sew This Snake?

The materials you’ll need to are pretty minimal. Here’s what you’ll need to sew your own snake.

  • Template: at the end of the pattern
  • Fabric: 2 different colors – 22” x 7”
  • Felt or Ribbon for Tongue:    Red – 4” x ¼” or ½”
  • Needle and Thread: To match snake fabric
  • Straight Pins
  • Stuffing and Chopstick
  • Safety Eyes: (2) 5mm, 8mm, or 12mm
  • Scissors
  • Pencil or Washable Marker

We’ve kept this snake design pretty simple, yet added a few special details to make it interesting.

Happy sewing!

Statue of Liberty Gnome Pin Loom Pattern

Weave your own Lady Liberty with pin looms! This step-by-step PDF pattern will show you how to transform simple squares and rectangles into your very own Statue of Liberty Gnome toy.

This plushie has many similarities to the actual Statue of Liberty. The torch, tablet and crown being the key elements. But did you also notice the broken chain? Because of the nature of pin loom weaving and the size of the project, this stuffed gnome isn’t an exact replica, but she is pretty darn cute!

What’s Included in the Statue of Liberty PDF Pattern?

  • Statue of Liberty with crown, torch and tablet
  • Detailed writtten instructions
  • 30+ color photos
  • 16 Pages
  • Tips and Tricks for shaping and finishing

Statue of Liberty Gnome PDF Pattern Available Now

The Statue of Liberty Gnome PDF Pattern is now available in our Etsy Shop.

Available Now on Etsy.

Buy Now on Etsy

This gnome was made with medium worsted weight (4) yarn. Any worsted weight should work. We love the color of Red Heart Soft in Sea Foam #9520. Besides the usual items like stuffing, the other odd item needed is black felt. Let’s take a look at what you need more closely.

What You’ll Need to Weave Statue of Liberty.

  • Pin Looms:   Squares: 2” and 4”,
  • Pin Looms: Rectangles: and 2” x 4” and 2”x6” and
  • Pin Looms: Rectangle: 1” x 4” (for the chains only)
  • Yarn:   Red Heart: Soft – Medium (4) SEA FOAM #9520 –  250 yds
  • Lion Brand: Basic Stitch – Medium (4) MUSTARD #158I – 5 yds
  • Needles:  6” needle for weaving and yarn needle for sewing
  • Stuffing
  • Felt – black, ½” x 5” strip
  • Fabric Glue
  • Beans to weigh the gnome down
  • Pet comb – metal
  • Steamer (optional)

Pin This Statue of Liberty Gnome Pin Loom Pattern to Pinterest

Share the love; pin this Statue of Liberty Gnome Pin Loom Tutorial to Pinterest.

About the Statue of Liberty and the Gnome

Liberty Enlightening the World is a statue more commonly referred to as the Statue of Liberty. Libertas, the Roman Goddess of Liberty, holds a torch and tablet, and stands in New York Harbor. She is a copper statue, given to the United States by France, and dedicated in 1886. There is a broken chain and shackle at her feet symbolizing the abolition of slavery in the United States. Though this gnome only has 5, Liberty has 7 rays forming a halo that represent the sun, the seven seas and the seven continents. There are 25 windows in the crown for viewing the harbor (the gnome has 11).

This gnome has a simple construction with components added to it that represent elements on the real statue. For instance, the Statue of Liberty is wearing robe, the gnome is wearing a sash. The halo, or rays, on the gnome is a band attached to the hat. Little bits of felt create the windows.

Get your copy of the Statue of Liberty Gnome Pin Loom Pattern on our Etsy Shop.

Buy Now on Etsy

Hammerhead Shark Sewing Pattern

Hammerhead Shark sewing pattern

Sew your own plushie Hammerhead Shark with this step-by-step pattern tutorial. This is a great project for beginners and sewing enthusiasts alike. The supplies you need to make this on a sewing machine are very minimal. A few pieces of fabric, a couple safety eyes and thread and you’re ready to sew!

Follow this pdf sewing pattern and you’ll have a finished hammerhead shark stuffed animal in a few hours. It’s that easy.

The step-by-step tutorial includes:

  • 18″ Hammerhead Shark
  • Step-by-Step written instructions
  • 15+ color photos
  • Printable Template for 8 1/2″ x 11 paper
  • Tips and tricks for sewing the shark
  • Links to helpful videos

Hammerhead Shark Sewing Pattern Available on Etsy

Purchase the Hammerhead Shark Sewing Pattern on our Etsy Shop.

Available now on Etsy.

Buy Now on Etsy

This is also a great project to make with scraps of fabric. Choose colorful printed fabric to make a playful and unique shark. The hammerhead shark pictured here was made with fleece sheets that landed in the recycle pile. This could be made from old clothes. This is the perfect project to make as a memory pillow, too.

What you need to make your own Hammerhead Shark Stuffed Animal:

  • Template: Found at the end of the pattern
  • Fabric: Grey – 16” x 20” White – 8” x 20”
  • Stabilizer or Felt: White – 1 sheet
  • Needle and Thread: Grey
  • Safety Eyes: (2) 18mm
  • Straight Pins
  • Fabric Glue
  • Embroidery Thread: 1 yard, black
  • Stuffing and Chopstick
  • Scissors
  • Pencil or Washable Marker

Pin This to Pinterest

Share the love, pin this image to pinterest.

More about the Hammerhead Shark Pattern

This pattern stands out from the rest because it includes all the little details that make this so realistic. It has all 8 fins common to Hammerhead Sharks and even includes the notch on the caudal (tail) fin.

The pattern includes 4 pages of templates. The body of the shark spans 2 page so the template pieces will need to be cut out and taped together. The template includes a 1″ scale so you know if it’s printing at full size. Reduce or enlarge the pages to make a smaller or larger stuffed animal.

We’ll include helpful tips throughout like where to start and stop sewing. What tools might make a step easier. The templates are clearly labeled and easy to follow.

The fins are made with a layer of felt or stabilizer which helps them stay rigid yet soft and huggable.

Hammerhead Sharks usually have a litter of pups…so you may need to make more than one!

Get your Hammerhead Shark Sewing Pattern on our Etsy Shop.

Buy Now on Etsy

Clownfish Sewing Pattern

Clownfish Hand Sewing Pattern with Felt

Hand sew a vibrant clownfish! Real clownfish can be found in many different colors including orange, yellow, red and black with white stripes or patches. This sewing pattern provides templates for the most traditionally recognized color, shape and size.

Clownfish Sewing Pattern Info

The clownfish sewing pattern has all the information you need to hand sew your own school of fish including:

  • 10 Pages
  • 15+ Color Photos
  • Printable Templates on 8 1/2″ x 11″ paper
  • Step-by-Step Written Instructions
  • Helpful Tips and Tricks for Hand Sewing with Felt
A school of hand sewn clownfish

When you print the template at 100%, your finished clownfish stuffed animal will measure approximately 6 3/4″ long x 3 1/4″ tall x 1 3/4″ thick. Real clownfish measure between 7 to 17 cm long (or 2.7 to 6.69 inches). For a smaller template, print or copy at a reduced size.

The Clownfish Sewing Pattern is available on our Etsy shop.

Available now on Etsy:

Buy Now on Etsy

Fun Facts About Clownfish

Clownfish are also called anemonefish because of their symbiotic relationship with anemone. They are located in the Indian and Pacific Oceans. Clownfish live in groups and only the dominant male and female are able to reproduce. Clownfish are born male and can become female when the dominant female dies.

Pin This to Pinterest

Share the love; pin this Clownfish pattern to Pinterest.

More About This Pattern Download

Want to know more?

We’ve given this pattern an “easy” rating. It’s a great project for a beginner. However, there are quite a few pieces to sew so you’ll need to set aside a few hours to complete it. We purposefully designed this clownfish sewing pattern to be easy, approachable and fun for sewing enthusiasts of all ages.

There are different kinds of felt: synthetic, wool, wool blends. We talk about that briefly in the pattern.

We include various tips and tricks for things we’ve learned as we’ve stitched our own school of clownfish stuffed animals.

The pattern uses two sewing stitches: whip stitch and applique stitch. We’ve included links to some videos that demonstrate those stitches in case you’re not already familiar with them.

We’ve photographed our hand sewn clownfish in a coral reef that was hand made with yarn on pin looms. There is no pattern for this scene, but there is a pin loom pattern for a gnome with hammerhead shark hat in our Etsy Shop.

Get your Clownfish Sewing Pattern in our Etsy Shop.

Buy Now on Etsy

Shark Attack Gnome

Shark Attack Gnome Pin Loom Pattern

This beach loving gnome spent a bit too much time in the water. His magnetic personality attracted a hammerhead shark and a trio of starfish!

Weave your own hammerhead shark gnome with this easy to follow tutorial. The Shark Attack Gnome Pin Loom Pattern includes:

  • 25+ Photos and Charts
  • 14 Pages
  • Step-by-Step Instructions
  • Hammerhead Shark
  • Gnome
  • 2 Types of Starfish

Several sizes of pin looms were used to create this beachy gnome. You’ll need:

  • Square Looms in 4″ and 2″ and 1″
  • Rectangle Looms in 1″x4″ and 2″x4″
  • Triangle Loom in 2″

Every element is plain weave woven on a pin loom except the shark teeth which are crocheted.

Get your Shark Attack Gnome Pin Loom Pattern today on our Etsy Shop.

Available now on:

Pin Shark Attack Gnome to Pinterest

Share the love; pin Shark Attack Pin Loom Gnome Pattern to Pinterest.

About Shark Attack Gnome Pin Loom Pattern

The assembled gnome measures about 18″ tall x 7″ wide x 5 1/2″ deep.

The pattern provides a chart of how many shapes are needed and in what color so you can weave them all ahead of time before you begin assembling the project. The yarn used was Lion Brand Basic Stitch.

There are helpful tips in the pattern. For the beard, for example, the pattern will mentioned that the yarn should be attached above the nose so the shark hat covers it. And that a metal cat comb was used to separate the strands making the beard appear more full. And a steam iron will help straighten out the yarn.

The shark is created separately and sits on the gnome like a hat.

The pattern includes a tutorial for making 2 different types of starfish. These were made on 1″ square looms.

Though the pattern is for your eyes only, we encourage you to give away or sell your finished projects.

Enjoy!

Gingham Gnome Pin Loom Pattern

This pin loom gnome has gorgeous fashion sense! Make your own gnome, hat and muff and learn a new pattern for pin loom weaving.

This step-by-step tutorial will show you how to use two colors to make a square and a rectangle with a quadrant print which looks just like gingham. The pattern has lots of photos and clear written instructions for making the gnome, hat and muff, too.

The Gingham Gnome Pattern includes:

  • Instructions to make a Gnome, Hat and Muff
  • Instructions to make a Gingham Square and Rectangle
  • 12 pages with color photos
  • Step-by-Step written instructions

PDF Download for Gingham Gnome Pin Loom Pattern Available Now.

The Gingham Gnome Pin Loom Pattern is available in our Etsy shop.

Available now on Etsy.

Buy Now on Etsy

Pin the Gingham Gnome to Pinterest

Share the love; pin this Gingham Gnome to pinterest.

More About the Gingham Gnome Pin Loom Pattern

You’ll be surprised at how easy it is to make this gnome. We list it as intermediate because of all the folding, tucking and sewing but this step-by-step tutorial will make it easy and fun to create.

What you’ll need to make this Gingham Gnome:

  • Pin Looms: –4” square, 2” x 4” rectangle
  • Yarn:   Red Heart: Soft – Medium (4)
  •  BLACK #4614 – 130 yds
  •  OFF WHITE #4601 – 45 yds
  •  WHITE #4600 – 50 yds
  • WHEAT #9388 – 10 yds
  • Needle:  6” needle for weaving and yarn needle for sewing
  • Pompom Maker: – 1 ¾” pom pom
  • Stuffing
  • Beans: to weigh the gnome down
  • Crochet Hook: – size G (optional)
  • Fabric Marker: – white, dark
  • Pet comb: – metal
  • Steamer (optional)

About Pin Loom Weaving the Gingham Gnome

This gingham gnome is made with only two pin looms: 4″ square and 2″x4″ rectangle. That’s all! It’s hard to imagine that this cute little gnome is made with only squares and rectangles, but simple folds, rolls and tucks transform simple shapes into a darling toy.

The base of the gnome is stuffed with beans to give it weight and prevent it from wabbling about. The rest is filled with polyfill stuffing.

The beard is made with yarn, then combed with a metal cat come to separate the strands. Then a steam iron was used to straighten out the yarn. These little details really make the beard shine.

Get your copy of the Gingham Gnome Pin Loo Pattern in our Etsy Shop.

Buy Now on Etsy

Veggie Soup Pin Loom Tutorial

Pin loom woven fruits and vegetables.
Weave delicious looking fruits and vegetables with 4″ pin loom squares

Veggie Soup Step-by-Step Tutorial

Carrots, tomatoes and mushrooms, oh my! This photo tutorial has 60+ photos and will show you how to fold, roll, tuck and sew 4″ pin loom woven squares into these deliciously fun shapes. It’s surprisingly easy!

Yes, you need only one pin loom…the 4″ square. All of the fruits and veggies were made with one loom.

Instant PDF Download Available Now

This Veggie Soup Pattern is available as a PDF digital download at Etsy.com.

Available now on our Etsy Shop.

Buy Now on Etsy

The veggies first appeared in Little Looms 2018, a publication of Long Thread Media. We have shared rights to the pattern and it’s now available as an instant download in our Etsy Shop.

Step-by-Step Guide Includes:

  • Eggplant
  • Peas in a Pod
  • Mushroom
  • Carrot
  • Tomato
  • Broccoli
  • 60+ beautiful color photos
  • 18 well organized pages
  • Easy to follow written instructions
  • Materials list
  • Directions to make 6 fruits and vegetables including: Broccoli Florets, Carrots, Eggplant, Mushrooms, Peas in a Pod and Tomatoes.
Cornucopia of fruits and vegetables make from 4" pin loom squares
Make your own cornucopia of pin loom fruits and vegetables.

Pattern Available at Etsy

Get instant access to the Veggie Soup Pin Loom Pattern by purchasing it from our Etsy shop.

Available now on Etsy

Buy Now on Etsy

Pin Loom Diary: Floral Afghans Pattern

Flower Blankets to Pin Loom Weave

First you make one flower, then another. Before you know it, you have a garden of flowers and a little bee, too!

We’ll confess, the first blanket we wove was the detailed one. It has 9 flowers and 1 bee. And it takes 7 pin loom shapes including squares, triangles and rectangles. And we love it. And we wanted every pin loom weaver to make one. But….not all pin loom weavers have 7 pin looms let alone the ones used in this pattern. So, a more simplified version was created. And it uses only 2 looms. Now everyone can weave their own flower garden!

About the Pin Loom Flower Afghan Pattern

This is great for beginners and experienced weavers alike as every shape is woven in plain weave.

There are two blankets in this Pin Loom Diary: Floral Afghans Pattern available in our Etsy Shop. Each has it’s own unique design and appeal.

Blanket A is the simple version with 5 flowers and a bee. The flowers are larger and the border is a solid color. It uses only 2 pin looms. The finished afghan measures approximately 56″x76″.

Blanket B is a more detailed version and has 9 flowers with stems and a bee. The flowers are smaller to allow space for leaves and stems. It uses 7 pin looms. The background and border on the detailed blanket is more quilt-like with pops of color sprinkled throughout. The finished afghan measures approximately 48″x72″.

What’s Included in the pattern:

  • 2 Flower Afghan Patterns
  • 16 pages
  • Charts of flowers and bees
  • Table of each shape, color and quantity needed for each motif
  • Table of total number of shapes, color and quantity needed for each blanket
  • Complete materials list
  • Pattern for simple flowers: sunflower, tulip, daffodil, daisy, zinnias
  • Pattern for detailed flowers: tulip, delphinium, daisy, daffodil, sunflower, indian paintbrush, calla lily, zinnia, poppy

PDF Instant Download Available Now

The Floral Afghans Pin Loom Pattern is now available in our Etsy Shop.

Available on Etsy.

Buy Now on Etsy

What You’ll Need:

With Flower Afghans Pin Loom Pattern in hand, here is a list of the other items you’ll need to weave one or both of these floral afghans.

  • Yarn: Caron Simply Soft or any medium worsted weight (4) yarn
  • Blanket A uses 11 colors
  • Blanket B uses 15 colors
  • 6″ needle for weaving and yarn needle for sewing
  • Blanket A Pin Looms: Square 4″ and Triangle 4″
  • Blanket B Pin Looms: Square 4″, 2″, 1″ and Triangle 4″, 2″ and Rectangle 2″x4″ and 2″x6″

These designs can be used for more than just afghans. We’ve made pillows and garden flags, too. What will you make with these flower shapes?

Oh, and be sure to join the Pin Loom Flower Afghan Weave Along in the Pin Loom Support Group on Facebook!

Pin This to Pinterest

Share the love: pin this photo to Pinterest.

Floral Afghans Pattern Now Available

Are you ready to weave your own garden of flowers?

The Pin Loom Diary: Floral Afghans is available as a PDF download in our Etsy Shop.

Available now on Etsy.

Buy Now on Etsy

Wolf Pencil Case Pin Loom Pattern

There’s no need to scratch and claw through the junk drawer looking for a pen. Make your own wolf pencil case with yarn and pin looms to store them in. These are great for holding pens, pencils, crochet hooks, mini scissors and more. And since it’s pin loom woven, you can even weave your needle through the outside of the case when you’re not using it.

The wolf pencil case measures approximately 12” long x 7” tall x 4” wide.

Pin These Pictures to Pinterest.

Share the love, pin this image to Pinterest.

Wolf Pencil Case Available on Etsy

The Wolf Pencil Case Pin Loom Pattern is now in our Etsy Shop.

Available now on Etsy.

Buy Now on Etsy

About the Wolf Pencil Case Pin Loom Pattern

This pencil case was a special request from one of the boys…he wanted a coyote. Both wolves and coyotes are a bit dog like, so sure, it’s not a wolf, it’s a coyote!

The pattern is 5 pages which includes step-by-step written instructions. There are 10+ photos that show the pencil case at different points of construction. Instructions are for the grey wolf, though step-by-step photos are often for the black dog. The shape for the black dog and grey wolf are the same.

Here’s what you’ll need to make the Pin Loom Wolf Pencil Case:

  • Pin Loom Square: 1”, 2”, and 4”
  • Pin Loom Rectangles: 2”x4”, 1”x4”
  • Yarn:   Red Heart: Soft – Medium (4), acrylic, 5 oz/256 yds
  •             Grayscale #9931
  •             Black #4614
  •             White #4600
  • Needle:           6” needle for weaving and yarn needle for sewing
  • Safety eyes: (2) 14mm
  • Safety nose: 2cm
  • Zipper: 9” in color of yarn
  • Fabric for lining: approximately 12” x 12”
  • Can – with 2 5/8” diameter for helping sew the ends to the body of the pencil case (optional)
  • Notions: straight pins, needle and thread

Please note that there are not photos to match each step-by-step written instruction. But there are photos throughout the pattern to help provide clarity.

PDF Instant Download Available

Buy the Wolf Pencil Case Pin Loom Pattern in our Etsy Shop.

Available Now on Etsy.

Buy Now on Etsy

The pattern is for your eyes only. We encourage you to give away or sell your finished work as long as you credit yarnovations.com as the designer.

Crochet Cable Dishcloth and Tea Towel

Dishcloth+ Series: Celery Stalks Dishcloth and Tea Towel – pattern with crochet cables.

Dishcloth and Tea Towel with crochet cables

Create stunning cables in these two lovely kitchen accessories.

Dishcloth and Tea TowelWhether you’re new to working post stitches or an old hat, the post work dishcloth is a must for your kitchen. The columns of stitches create a bumpy texture perfect for scrubbing pots and pans.

The tea towel takes crochet cables to a whole other level. Create a stunning tea towel as a house warming gift or for your own home.

Buy Now on Etsy

The Cabled Dishie and Tea Towel are available in our Etsy Shop.

Available on Etsy.

Buy Now on Etsy

This set is crocheted with  Fibra Natura Good Earth distributed by Universal Yarn. This cotton linen blend is perfect for going from sink to washing machine and back again.