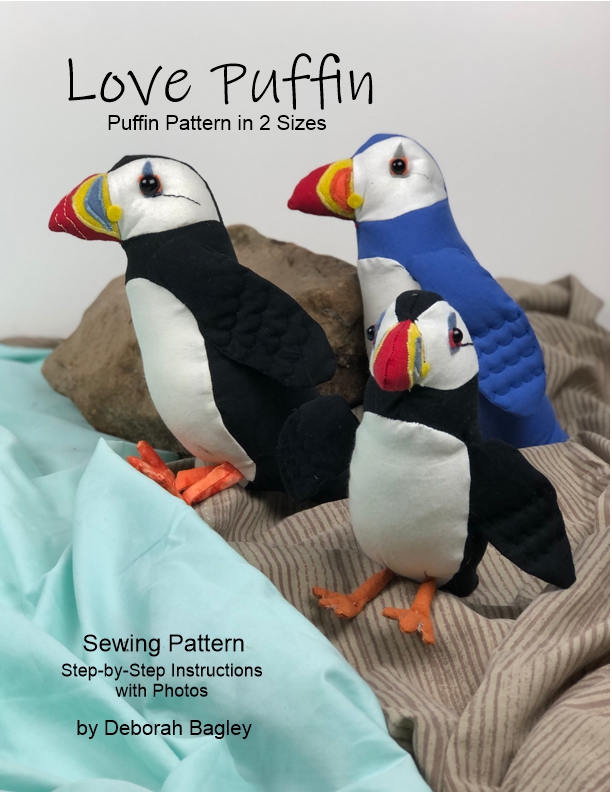
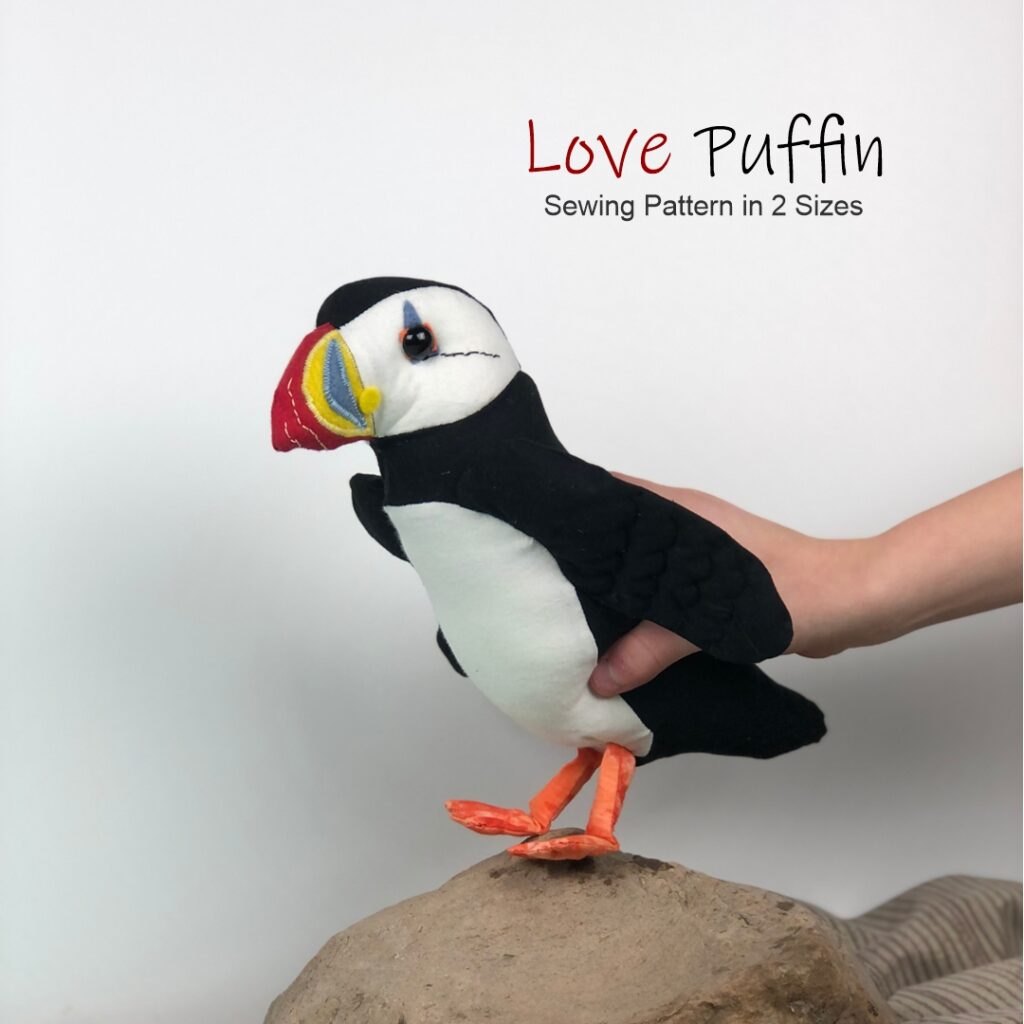
Bottlenose Dolphin Sewing Pattern

Looking for a beginner friendly sewing tutorial? Try this fun and easy Bottlenose Dolphin Sewing Pattern. It has step-by-step instructions, lots of photos and is great for brand new sewists.

*coral not included.

bottle nose dolphin sewing pattern

We love making patterns for people new to sewing. The bottlenose dolphin is a great first project. The end result is something fun to hold and to hug. Here’s what’s included in the tutorial:

  • Dolphin Instructions
  • Tracing Templates
  • Step by Step Written Instructions
  • 13 Pages
  • 20 Photos

Reviews of Our Sewing Patterns

  • “Wonderful pattern, was very easy to follow and the images were very helpful.”
  • “This pattern was exactly as advertised and met my expectations. The instruction were great and easy to follow.”
  • “Great project! Easy and clear assembly directions!”

Bottlenose Dolphin Pattern on Etsy

The Bottlenose Dolphin Pattern is now available on Etsy. This is a beginner friendly step-by-step tutorial with photos.

Available now on Etsy.

Buy the pattern on etsy

Share the Love – Pin This to Pinterest

Share the love of sewing and dolphins…pin this image to pinterest.

Thank you!

The Bottlenose Dolphin Sewing Pattern

Real dolphins can grow to be up to 13 feel long and 660 pounds. Ours is bit smaller than that. This bottlenose dolphin stuffed animal measures approximately 10 1/4″ long x 3″ wide x 4 1/2″ tall. It can be made with traditional grey and white fabric or other bright and colorful fabrics, too. This is a great project to reuse fabric you have on hand like old bed sheets.

The supplies list is very minimal for this beginner friendly sewing pattern. To make the bottlenose dolphin stuffed animal you’ll need:

  • Pattern Pieces: templates at the end of the pattern
  • Fabric: Grey – 12” x 10”, White – 12” x 3 ½”
  • Felt or Stabilizer (optional): White – 4” x 6”
  • Needle and Thread: Grey
  • Safety Eyes: (2) 10mm
  • Straight Pins
  • Fabric Glue
  • Stuffing and Chopstick
  • Scissors
  • Pencil or Washable Marker

Get the pattern and make a bottlenose dolphin today!

Bottlenose Dolphin Sewing Pattern on Etsy

The bottlenose dolphin sewing pattern is available now in our Etsy Shop.

Available now on Etsy.

Buy the pattern on etsy

Denim and Fabric Basket Sewing Pattern Collection

Sew your own gorgeous basket with this fun and easy Denim Basket sewing pattern PDF.

It’s a beginner friendly sewing pattern with step-by-step instructions and photos. Traceable templates are included for a denim basket (or fabric basket) that measures 10″ wide x 6″ long x 6 1/2″ tall.

About The Denim Basket (Fabric Basket) Pattern

This denim basket sewing pattern is FULL of helpful information making it great for new and experienced sewists alike. Here’s what’s in the basket sewing pattern:

  • 1 basket pattern: 10″ wide x 6″ long x 6 1/2″ tall
  • 2 lining options: sewn in or sewn separate
  • 3 handle options
  • 6 fabric designs
  • Traceable templates
  • 40 pages
  • 70+ photos
  • Beginner Friendly
  • Step-by-Step instructions

You can build your own fabric design, or sew a basket with a solid piece of material.

denim basket and fabric basket options in this beginner friendly sewing pattern

What material do you need to make a denim basket?

You only need 1 pair of children’s jeans to make a denim basket. However, we used 5 pairs for the chevron because we wanted different shades of blues and black material. You can use any denim you have on hand to make the denim baskets. If you want a basket with a pocket on the front, we recommend children’s jeans as the small size pocket is a perfect fit. Don’t have denim, check out your local second hand store for a pair or two.

What material do you need to make a fabric basket?

If you want to sew a basket from fabric, you have even more options. You can buy new fabric or use material you have on hand such as clothing and bed linens. This is a great time to upcycle fabrics that are worn or neglected or have a stain or two (just cut around those bad spots). The second hand store is also a great resource because you can browse all the clothing departments (children, men’s women’s) as well as the linens. We recommend cotton fibers for new sewists.

How much material is needed to sew a denim basket?

The denim basket and fabric basket each require 3 layers of fabric.

  • Layer 1: The outside fabric (such as denim or cotton)
    (2) pieces at least 12″ x 17″
  • Layer 2: The inside lining fabric (such as muslin or cotton)
    (2) pieces at least 13″ x 17″
  • Layer 3: The stabilizer (ultra firm – fusible or non-fusible)
    (1) piece at least 20″ x 24″

You’ll also need thread to match your fabric.

The Denim Basket / Fabric Basket Sewing Pattern PDF

You’ll also need the Denim Basket Sewing Pattern. It’s available in our Etsy Shop.

Now available on Etsy.

Buy the pattern on etsy

1 Basket Pattern – 6 Fabric Designs

Even though there is only 1 size basket in this pattern, we show you how to create 6 unique fabric designs. So it’s really 6 patterns in 1!

Basket measures: 10″ wide x 6″ long x 6 1/2″ tall.

The 6 fabric designs included in the denim basket sewing pattern are as follows. Keep in mind that this is in addition to a solid fabric basket design:

  • Chevron
  • Quadrant
  • Pocket Front
  • Stripes
  • Wide Stripe
  • Scrappy
Denim Basket with pocket used as baby diaper basket

Uses for Denim Basket (Fabric Basket)

This 10″ x 6″ basket size is really quite convenient. It will help you get organized and help your house feel neat and tidy. We’ve used these baskets as:

  • Baby Diaper Basket
  • Baby Shower Gift
  • Paperless Towel Basket
  • Book Storage
  • Bathroom Storage
  • Christmas Basket
  • Laundry Room Storage Basket
  • College Dorm Room Storage Basket
  • And more…

Pin Our Picture to Pinterest

Share the love. Pin our pictures to Pinterest.

Buy the Denim Basket and Fabric Basket Sewing Pattern on Etsy.

We had a lot of fun sewing basket after basket. You will, too. The Denim Basket Sewing Pattern is available in our Etsy Shop.

Available now on Etsy.

Buy the pattern on etsy

Bear Pillow Sewing Pattern

Looking for a bear sewing pattern? Look no further. This step-by-step tutorial will guide you through each step of turning fabric into a cute and cuddly bear pillow. Mix and match your fabric to make your own one of a kind bear.

This sewing project is so much fun, and easy, that we kept coming up with more bears to make. This tutorial is great for making all kinds of bears such as: Asiatic black bear (moon bear), brown bear (including grizzly), giant panda, North American black bear, polar bear, sloth bear, Andean bear (spectacled), and sun bear!

Not only that, this bear pillow is festive, too. One can be made for various holidays by changing out the fabric on the scarf. These are great for new baby, nursery and baby shower gifts, Christmas, Halloween, and going away to college gifts. They also make great gifts for boys and gifts for girls, memory bears, gifts for bear enthusiasts and bears for those who love to cuddle.

They can also be a heartfelt and thoughtful gift for someone that has lost a loved one. Sew the bear with a shirt that belonged to their special person and they can hug it in times of sorrow.

The bear sewing pattern includes:

  • Bear Pillow Pal Rectangular Pillow Pattern
  • Panda Bear Instructions
  • Bamboo Instructions
  • Step-by-Step Written Instructions
  • 25+ Color Photos
  • 10 Printable Template Pages (8.5″x11″)
  • Complete Materials List
  • Helpful Tips
  • Information About Sewing Machine Settings
  • Links to helpful videos

The finished measurements of the bear pillow are approximately 16″ wide x 3 1/2″ deep x 12″ tall. The templates are drawn at 100% and can be printed on 8.5″ x 11″ paper. So you’ll need to cut out the templates and tape pieces together.

Bear Pillow Available on Etsy

Our bear pillow sewing pattern is available in our Etsy Shop.

Available now on Etsy.

Buy Now on Etsy

More About the Bear Pillow Pattern

Bonus: Panda and Bamboo are included!

This bear pillow pattern can be sewn in an afternoon if you have all the supplies. Here’s what you’ll need to sew your own bear pillow:

  • Pattern Pieces: Template included with pattern
  • Fabric: Head Color: 20” x 10”
  • Snout Color: 12” x 5”
  • Scarf Color: 25” x 12”
  • Bamboo: 25” x 4” per stalk
  • Felt: Black – 1 sheet (10” x 5”)
  • Thread: To match felt and fabric
  • Straight Pins and Needle
  • Stuffing: Approximately 8-10 oz of Poly-fil or 12”x16” pillow form
  • Scissors
  • Sewing Machine
  • Pencil, Pen or Chaulk

Pin a Picture to Pinterest

Share the love, pin these pictures to Pinterest.

Even More about the Bear Sewing Pattern

This is a great pattern for sewists of all abilities from the brand new to the seasoned enthusiast. The tutorial includes information about how to set up your sewing machine and different stitches to use. Three different stitches were used on the bear because sometimes the fabric is sewn on the right side and sometimes on the wrong side.

The pattern will take you step-by-step with written instructions and helpful color photos. Helpful tips and included as well as links to videos that will show you different sewing techniques.

So, pick out your fabric and head over to Etsy for your copy of the Bear Pillow Sewing Pattern.

This pattern is for your eyes only. We encourage you to give away or sell your finished projects and ask that you mention Yarnovations.com as designer. Thanks.

Get your copy of the Bear Pillow Sewing Pattern on Etsy.

Buy Now on Etsy

Snake Sewing Pattern

Looking for a fun toy for the kids? Snakes are a blast to play with and they look great in a wide variety of fabric! This step-by-step sewing tutorial has printable templates to make a 21″ long snake. What makes this particular pattern unique is the eye hood. Some snakes have what appears to be a brow above their eyes…so we’ve added that feature to this pattern. It definitely gives this serpent an aura of invincibility.

The safety eyes used can make a big difference in how “sinister” your snake will look. We used various colors and sizes of safety eyes to demonstrate how that one little detail will impact the look of your stuffed animal.

What’s in the Snake Sewing Pattern?

This is a step-by-step tutorial with printable template. The template is at 100% scale so you’ll tape together pieces from 3 pages to create the 21″ long snake top and another 3 pages to create the bottom. Here’s what’s in the PDF pattern.

  • Step-by-step written instructions
  • 15 color photos
  • Template printable on 8 1/2″ x 11 paper
  • Materials List
  • Helpful tips
  • Links to sewing videos

Snake Sewing Pattern Available on Etsy

This snake sewing pattern is available in our Etsy Shop.

Available now on Etsy.

Etsy Shop

Pin This Snake Pattern to Pinterest

Share the love, pin this picture to Pinterest.

What Will You Need to Sew This Snake?

The materials you’ll need to are pretty minimal. Here’s what you’ll need to sew your own snake.

  • Template: at the end of the pattern
  • Fabric: 2 different colors – 22” x 7”
  • Felt or Ribbon for Tongue:    Red – 4” x ¼” or ½”
  • Needle and Thread: To match snake fabric
  • Straight Pins
  • Stuffing and Chopstick
  • Safety Eyes: (2) 5mm, 8mm, or 12mm
  • Scissors
  • Pencil or Washable Marker

We’ve kept this snake design pretty simple, yet added a few special details to make it interesting.

Happy sewing!

Hammerhead Shark Sewing Pattern

Hammerhead Shark sewing pattern

Sew your own plushie Hammerhead Shark with this step-by-step pattern tutorial. This is a great project for beginners and sewing enthusiasts alike. The supplies you need to make this on a sewing machine are very minimal. A few pieces of fabric, a couple safety eyes and thread and you’re ready to sew!

Follow this pdf sewing pattern and you’ll have a finished hammerhead shark stuffed animal in a few hours. It’s that easy.

The step-by-step tutorial includes:

  • 18″ Hammerhead Shark
  • Step-by-Step written instructions
  • 15+ color photos
  • Printable Template for 8 1/2″ x 11 paper
  • Tips and tricks for sewing the shark
  • Links to helpful videos

Hammerhead Shark Sewing Pattern Available on Etsy

Purchase the Hammerhead Shark Sewing Pattern on our Etsy Shop.

Available now on Etsy.

Buy Now on Etsy

This is also a great project to make with scraps of fabric. Choose colorful printed fabric to make a playful and unique shark. The hammerhead shark pictured here was made with fleece sheets that landed in the recycle pile. This could be made from old clothes. This is the perfect project to make as a memory pillow, too.

What you need to make your own Hammerhead Shark Stuffed Animal:

  • Template: Found at the end of the pattern
  • Fabric: Grey – 16” x 20” White – 8” x 20”
  • Stabilizer or Felt: White – 1 sheet
  • Needle and Thread: Grey
  • Safety Eyes: (2) 18mm
  • Straight Pins
  • Fabric Glue
  • Embroidery Thread: 1 yard, black
  • Stuffing and Chopstick
  • Scissors
  • Pencil or Washable Marker

Pin This to Pinterest

Share the love, pin this image to pinterest.

More about the Hammerhead Shark Pattern

This pattern stands out from the rest because it includes all the little details that make this so realistic. It has all 8 fins common to Hammerhead Sharks and even includes the notch on the caudal (tail) fin.

The pattern includes 4 pages of templates. The body of the shark spans 2 page so the template pieces will need to be cut out and taped together. The template includes a 1″ scale so you know if it’s printing at full size. Reduce or enlarge the pages to make a smaller or larger stuffed animal.

We’ll include helpful tips throughout like where to start and stop sewing. What tools might make a step easier. The templates are clearly labeled and easy to follow.

The fins are made with a layer of felt or stabilizer which helps them stay rigid yet soft and huggable.

Hammerhead Sharks usually have a litter of pups…so you may need to make more than one!

Get your Hammerhead Shark Sewing Pattern on our Etsy Shop.

Buy Now on Etsy

Clownfish Sewing Pattern

Clownfish Hand Sewing Pattern with Felt

Hand sew a vibrant clownfish! Real clownfish can be found in many different colors including orange, yellow, red and black with white stripes or patches. This sewing pattern provides templates for the most traditionally recognized color, shape and size.

Clownfish Sewing Pattern Info

The clownfish sewing pattern has all the information you need to hand sew your own school of fish including:

  • 10 Pages
  • 15+ Color Photos
  • Printable Templates on 8 1/2″ x 11″ paper
  • Step-by-Step Written Instructions
  • Helpful Tips and Tricks for Hand Sewing with Felt
A school of hand sewn clownfish

When you print the template at 100%, your finished clownfish stuffed animal will measure approximately 6 3/4″ long x 3 1/4″ tall x 1 3/4″ thick. Real clownfish measure between 7 to 17 cm long (or 2.7 to 6.69 inches). For a smaller template, print or copy at a reduced size.

The Clownfish Sewing Pattern is available on our Etsy shop.

Available now on Etsy:

Buy Now on Etsy

Fun Facts About Clownfish

Clownfish are also called anemonefish because of their symbiotic relationship with anemone. They are located in the Indian and Pacific Oceans. Clownfish live in groups and only the dominant male and female are able to reproduce. Clownfish are born male and can become female when the dominant female dies.

Pin This to Pinterest

Share the love; pin this Clownfish pattern to Pinterest.

More About This Pattern Download

Want to know more?

We’ve given this pattern an “easy” rating. It’s a great project for a beginner. However, there are quite a few pieces to sew so you’ll need to set aside a few hours to complete it. We purposefully designed this clownfish sewing pattern to be easy, approachable and fun for sewing enthusiasts of all ages.

There are different kinds of felt: synthetic, wool, wool blends. We talk about that briefly in the pattern.

We include various tips and tricks for things we’ve learned as we’ve stitched our own school of clownfish stuffed animals.

The pattern uses two sewing stitches: whip stitch and applique stitch. We’ve included links to some videos that demonstrate those stitches in case you’re not already familiar with them.

We’ve photographed our hand sewn clownfish in a coral reef that was hand made with yarn on pin looms. There is no pattern for this scene, but there is a pin loom pattern for a gnome with hammerhead shark hat in our Etsy Shop.

Get your Clownfish Sewing Pattern in our Etsy Shop.

Buy Now on Etsy

Making Animals for VBS

Sewing Bug

Got the sewing bug this year as preparations were made for vacation Bible school. The theme is Australia and team names are various animals found down under. Down the rabbit hole we went sewing animals to give away to the kids.

Sewn Koalas, jellyfish, clown fish, dingos and platypus. These creatures are so different and fascinating.

Got the pin looms out to create some turtles. It’s amazing how different they look with yarns of different colors both solid and variegated.

The turtles were made with a few different looms including:

  • hexagon pin loom
  • 2″x4″ rectangle pin loom
  • 2″ square pin loom

Found the sewing patterns online. Some were on Etsy others were free on various blogs. The turtles were inspired by a weave along on the Facebook Pin Loom Support Group. If you love to craft, we encourage you to look into pin loom weaving and join this private group for inspiration.

A Motivation to Make Beginner Friendly Sewing Patterns

Though we’ve been life long crafters, we have sewed out of utility rather than pleasure (i.e. lining for crochet bags). Our mother was much the same. She dutifully, if a little grudgingly, sewed costumes for our high school drama performances.

But when the spark ignites, sometimes a scarcely used skill can grow into a new passion. It began as a simple desire for Deborah; to make a few stuffed animals to hand out at Vacation Bible School. She poked around the internet a bit, searched Pinterest and Etsy. Then down the rabbit hole she plunged.

Sewing for Vacation Bible School

With a mix of free online patterns and some purchased on Etsy, Deborah began to sew. She made six koalas and found it kind of fun. She found another pattern, then another. Soon she was creating a large collection of creatures. She sewed and sewed.

And sewed some more. She made koalas, fish, dingos, kangaroos and many more animals.

clown fish sewing pattern

This adorable little orange fish was our first sewing pattern inspired from the VBS experience. The Clown Fish Sewing Pattern is stitched entirely by hand with felt fabric. It’s super cute. As we’ll mention in a moment, this pattern also includes traceable templates.

Creating Sewing Patterns

Deborah soon found that although there are a lot of great patterns online, sometimes there’s a void; the variety may be limited or the style not quite right. So Deborah began creating her own patterns.

A well written pattern makes the sewing experience more enjoyable, as recent experience would show. So we decided that we wanted our beginner friendly sewing patterns to have 3 key components:

  • Step-by-Step Written Instructions
  • Lots of Color Progress Photos
  • Printable and Traceable Templates at 100% Scale

Snake Sewing Pattern

One of the first sewing patterns we put together was for a snake. This one has an exaggerated brow above the eye. It gives the snake attitude. Learn more about the Snake Sewing Pattern on our blog.

snake sewing pattern

Hammerhead Shark Sewing Pattern

Another of our beginner friendly sewing patterns is the Hammerhead Shark. This time the emphasis was on the fins. Our shark stuffed animal has all the same fins that a real one has. Learn more about the Hammerhead Shark Sewing Pattern on our blog.

hammerhead shark sewing pattern

Bear Pillow Sewing Pattern

One last beginner friendly sewing pattern I’d like to highlight is the bear pillow. This character is 100% huggable. And with a few modifications, the bear can be a panda or a brown bear. Learn more about the Bear Pillow Sewing Pattern on our blog.

bear pillow sewing pattern

Whatever you sew, we wish you many happy stitchable moments.

Giraffe Pin Loom Pillow in Little Looms

The worlds tallest mammal is now the worlds tallest pin loom pillow. Ok, we just made that up. But it might be true. This giraffe pin loom body pillow measures approximately 16″ wide x 49″ tall. If it’s not the tallest pin loom pillow, we don’t know what is!

Kick back and relax with your very own cozy long-necked friend. This large pin loom body pillow has a quilt-like front and a fabric back, sewn together with a binding edge. There is shaping and layering on the nose portion of the giraffe, otherwise, each woven shape is sewn to the shapes next to it like a puzzle.

Giraffe Pin Loom Pillow available at Little Looms

We designed the Giraffe Pin Loom Pillow for Little Looms magazine and it made it’s debut in the Little Looms Magazine Winter 2022. To get the pattern, you can purchase a digital copy of the magazine or join their all access program. Learn more on the Little Looms website.

About the Giraffe Pin Loom Body Pillow Pattern

As we’ve said, this giraffe pillow is tall, so there are a lot of shapes to weave. It’s kind of like weaving a lapghan only more cuddly. To cut down on the weaving, we’ve attached a fabric back. But you could certainly weave squares for the back as well.

Everything is woven in plain weave.

Here’s what you’ll need to make your own Giraffe Pin Loom Pillow:

  • Pin Loom Squares: 1”, 2”, and 4”
  • Pin Loom Triangles: 2” and 4” right triangles
  • Pin Loom Rectangles: 2” x 4” and 2” x 6”
  • Needle: 7″ weaving needle; tapestry needle; sewing needle
  • Sewing Machine (though you could hand stitch the project)
  • Yarns Lion Brand Heartland (100% acrylic; 251 yd/5 oz), #173 Everglades, 370 yd; #158 Yellowstone, 160 yd; #124 Big Bend, 70 yd; #153 Black Canyon, 1 yd.
  • Fiber-fil
  • 17” x 50” fabric
  • 4 yds brown double fold ¼” bias tape,
  • brown thread

Enjoy!