Pin loom weaving is really quite simple. There aren’t a lot “secrets” to the perfect weave, but there are a few things you may find helpful. Here are some of our favorite weaving tip and tricks, in no particular order.
1. Leave A Tail For Weaving
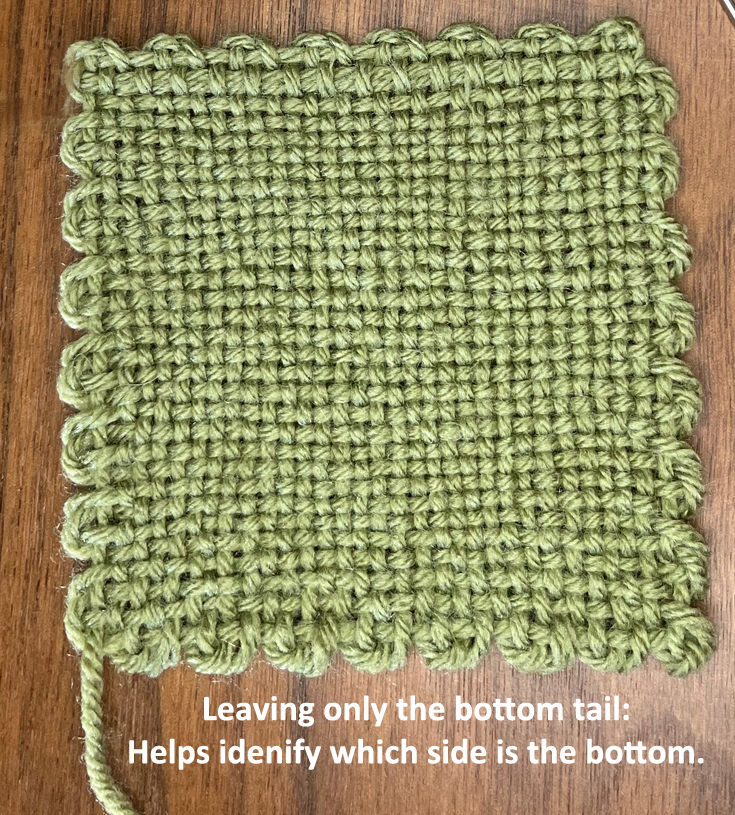
Weaving in tails can be a pain. To keep them to a minimum, consider keeping only one tail, either the starting or ending tail. Use this tail for joining woven shapes. The length of the tail will vary depending on the project you are making. If you are just joining two shapes, then you’ll want a shorter tail – maybe 8″. If you are weaving a large project and joining lots of shapes, you’ll want a longer tail – maybe 12″.
2. Leave A Tail To Identify The Top/Bottom
It can be challenging to identify which side is the top of your shape and which is the bottom. Consistently only leave one tail on your projects to make it easy to identify. If you always weave in your finished tail, then the starting tail helps to identify the bottom of the shape.
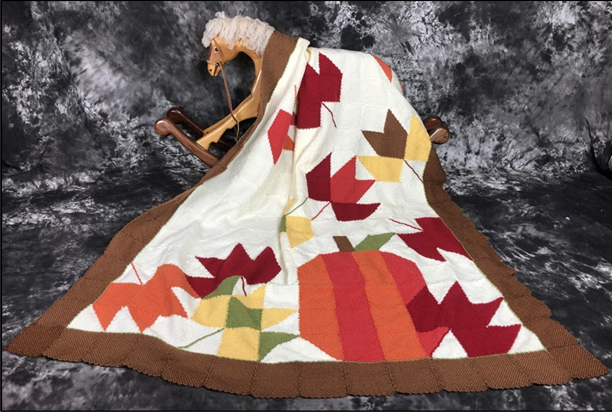
Following the advise of Trick #1 and #2, we were able to lay out the squares in the Falling into Autumn afghan so the bottoms where always down. The top of one square was joined to the bottom of the next. This made joining easier and consistent since the bumps/loops on the outer edge of the pin loom shapes are different on each side. Some woven shapes did need to be turned to make the design, but wherever possible, we tried to lay out and join shapes with the bottom always down.
3. Packing Yarn With or Without a Comb
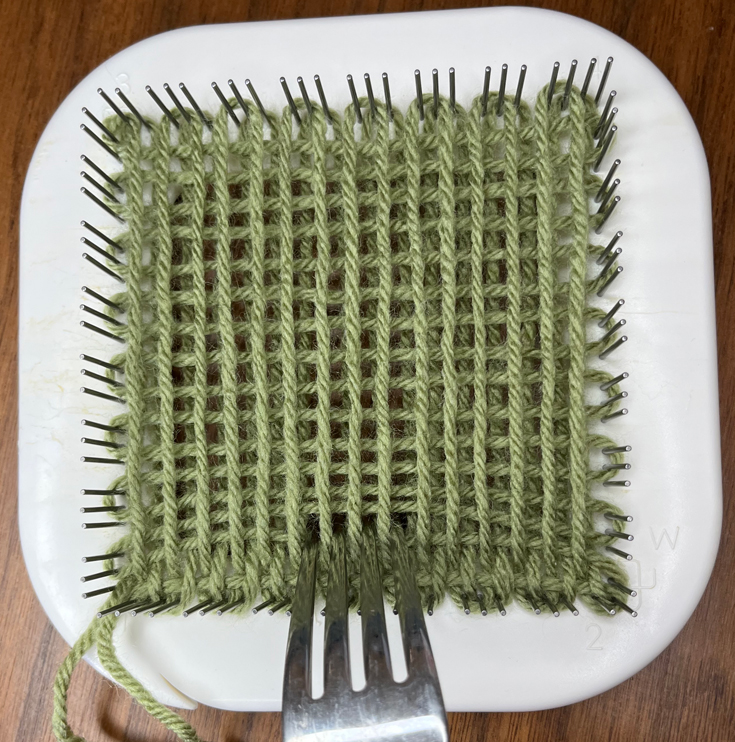
After the first row (and each row) of weaving you’ll notice that the next couple of strands are out of alignment. The horizonal strands are wavy and uneven making it difficult to find you next weaving path. To straighten the strands, you use a packing comb to comb the strand you just wove and the next strand to the bottom of the loom. Don’t have a packing comb? No problem. You can pack with a dinner fork, hair pick or even your weaving needle. Learn how to pack down yarn and why on our blog: How to Pack Down Yarn in Pin Loom Weaving.
4. Looms Aren’t All The Exact Same Size
Looms can be slightly larger or smaller than their labeled size. Let’s consider the 4″ square loom. Some manufacturers will place the pins so the yarn is woven at 4″ where others will place the pins at 4″, therefore the weaving is slightly larger than 4″. Neither is better, neither is wrong.
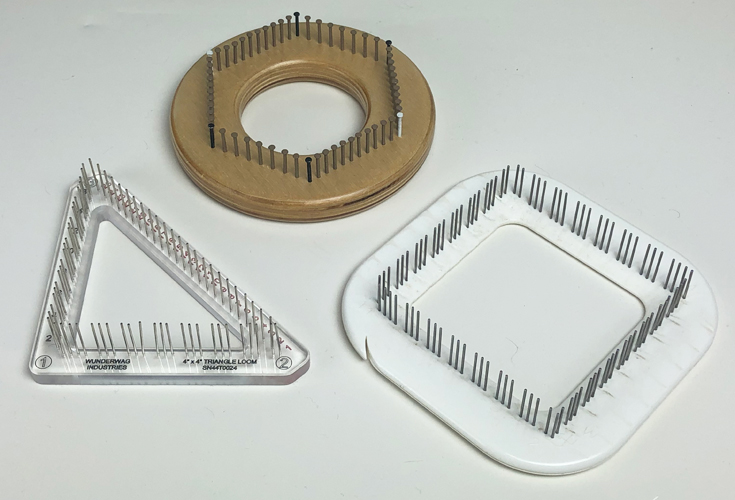
You’ll notice this difference when you join shapes together using looms from different manufacturers. You’ll find that some shapes are slightly larger than others. The Zoom Loom (bottom right) and Wunderwag (bottom left) looms have very similar pin placement and work well together. Bluebonnet Crafters (middle top) looms create shapes that are slightly larger.
For the most part, it’s really not a problem to have a collection of looms from various manufacturers. You may find that there is a little bit of pulling or pooling of fabric as you join them. That’s most noticeable on projects like afghans. We use looms from all three of the manufacturers listed previously as well as looms we’ve made ourselves. We mix and match looms all the time.
5. How To Identify The Strand To Weave Over or Under
Sometimes it can be challenging to find the next strand to weave under or over, especially on the first few rows. When you are weaving “Plain Weave” (under one, over one), you’ll know you found the right strand because it will have a little resistance to it.
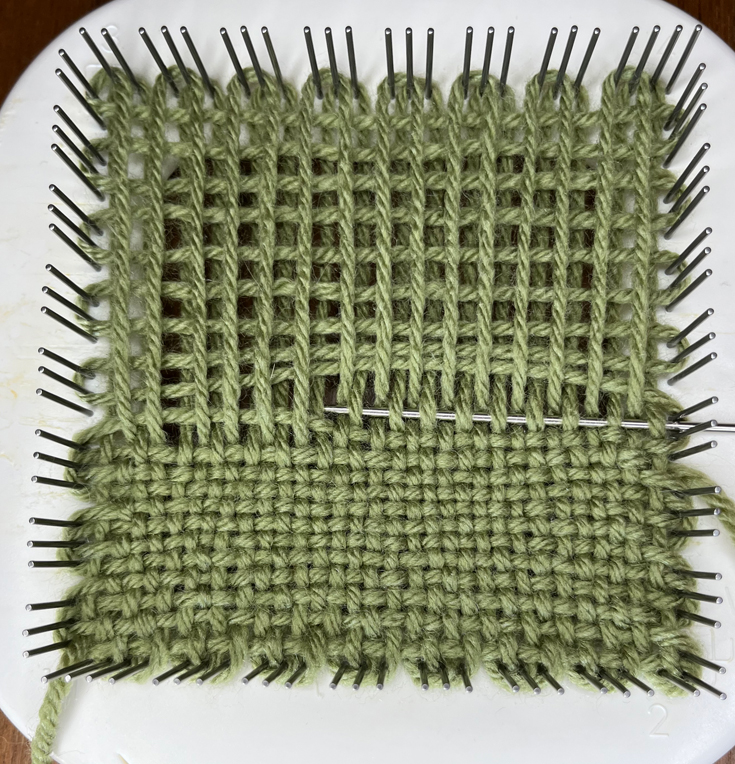
In the photo above, the needle is grabbing the yarn that’s lower. It would be easier to weave over it, but in plain weave, that’s the one the needle needs to go under. After that’s picked up, the next strand is the opposite. It’s higher so it would be easier to weave under it. So therefore, it’s the strand that you will weave over.
6. Use Both Hands To Weave
Whether you hold the loom in your hands, in your lap or lay it on a table, you may find it helpful to use both hands to weave. One hand will hold the weaving needle and the other will gently press on your yarn to help move strands to the right or left so it’s easier to weave.
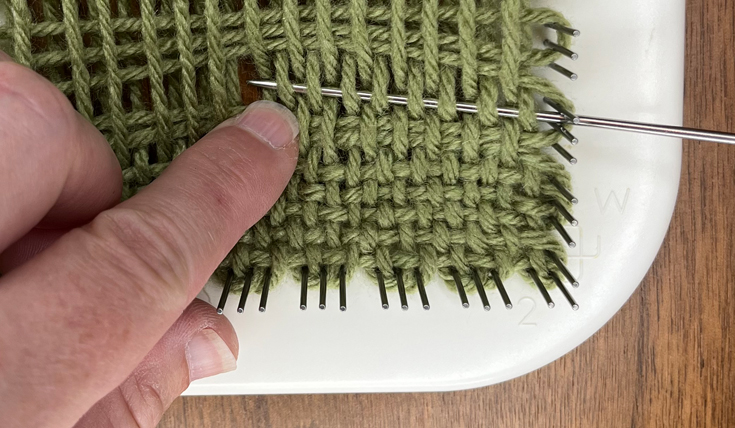
In the photo above you can see that I’m pushing the higher strand to the right which allows me to see the next lower strand that I need to pass the needle under.
Sometimes you may find that it’s helpful to move yarn from on top and other times from below. You may also find that you turn the loom a quarter turn to make weaving easier.
7. Turn The Loom For Comfort
One of the perks of pin loom weaving is that it’s small and portable. That means you can turn it any which way you want to make your weaving experience more enjoyable.
The most obvious would be to turn the loom 180 degrees so you weave in the direction that’s most comfortable. If you’re right handed, then you will most likely weave from right to left. So, turn the loom so that you always start your weave on the right.
Sometimes, however, you may find that you want to turn the loom 45 or 90 degrees. Or maybe you want to tilt it up or down because a strand is being tricky to weave over or under. Or you want to get your hand above or below your work.
Great! You can. We lay the loom on our lap for most of our weaving but often pick it up and twist and turn it as we weave.
8. The Needle Gets Stuck On The Pins
You may find that your weaving needle is too wide to fit through the pins. After you’ve woven under and over strands all the way across, you find that the needle gets stuck. The pins are too close together.
More likely than not, the needle is not too big, but you need to twist it a quarter turn so the eye is not as wide. The eye of the needle has a wide side and a narrow side and you just need to give it a turn.
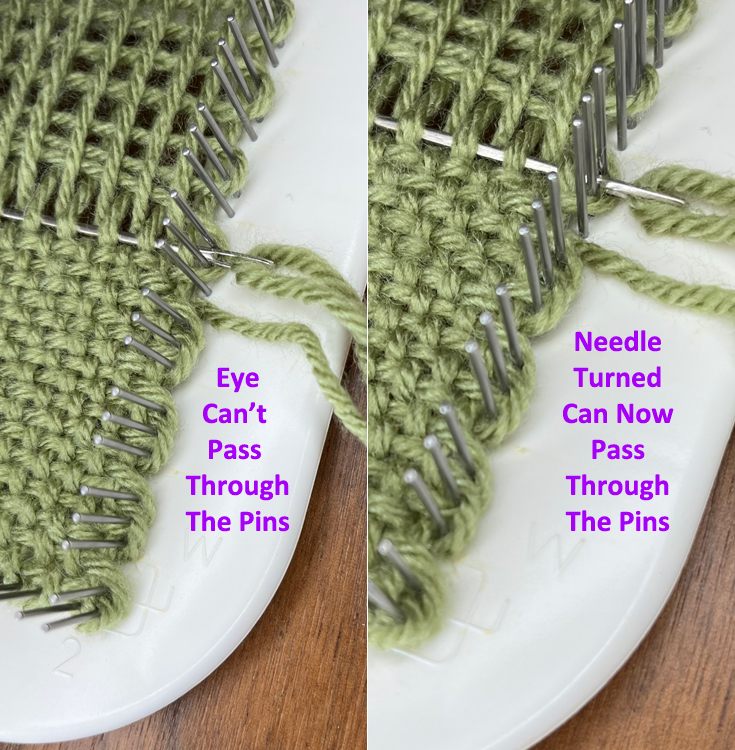
You can create a bit of muscle memory where you naturally turn the needle at the end of your weaving. Your fingers will feel that the needle needs to be turned just as you start to pull it through. It’s something to practice.
9. Snagged Or Split Yarn
It is really easy to snag or split the yarn as we weave. Meaning the needle went through a strand of yarn instead of completely under or over it. Hopefully you catch that mistake as soon as it happens and you can pull the needle out and reweave the strand. But sometimes you don’t notice.
The problem with snagging and splitting yarn is two fold. First, the yarn is trapped in the middle of a strand and will make packing your weave more difficult and may hinder it from packing tight enough. Second, it will show on the back side and look like you missed weaving a strand; it will look like you wove under 3 and have a long strand.
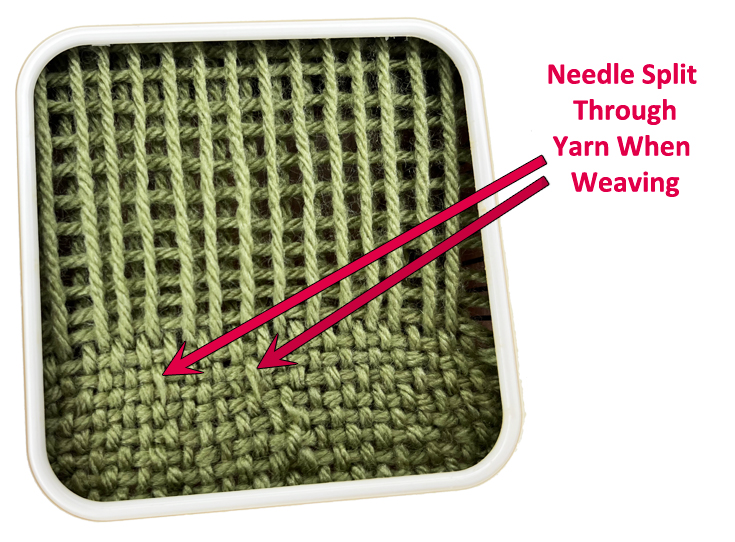
It’s best to pull out the row and reweave it. If you notice it before you finish weaving your shape, you can try to pull out each row and reweave it. But sometimes we don’t notice until the weaving is complete. In those instances, you can choose to go with it or send the shape to timeout. You may find a use for it in a future project.
10: What Yarn To Use
Because the pins are fixed on a pin loom, the yarn is the only variable you can change. There are a few thing to consider when choosing yarn: yarn weight, fiber content and yarn structure. Below is a VERY brief overview of yarns. Check out the post Selecting Yarns for Pin Loom Weaving for a more details look at yarns and pin loom weaving.
You need 8 yards of yarn to make a 4″ square. We wrote a blog post on What Can You Make With 8 Yards of Yarn and compared pin loom to crochet and knitting.
Yarn Weight
Most people use a light weight (3) or medium worsted weight (4) because the fabric of a pin loom woven shape has some drape yet the holes are small. If you use a thin yarn, you may want to double it up.
Yarn Fiber Content
You can use any yarn but those with some elasticity are easier to weave. When you pull on the strand, does the yarn stretch? Then it has some elasticity. Wool and acrylics are easier to weave on a pin loom than cotton and bamboo yarns.
Yarn Structure
Smooth yarns are the the easiest to work with, and most yarns fit into this category. Yarns with bumps, halos and eyelash yarns are very challenging to weave with.
So, if you’re new to weaving or wanting to work on a relaxing project our recommendations. You only need 8 yards to make a square. Try using one of these:
- Cascade 220 Superwash or 220 Superwash Sport
- Lion Brand Heartland or Baby Soft
- Red Heart Soft
- Caron Simply Soft
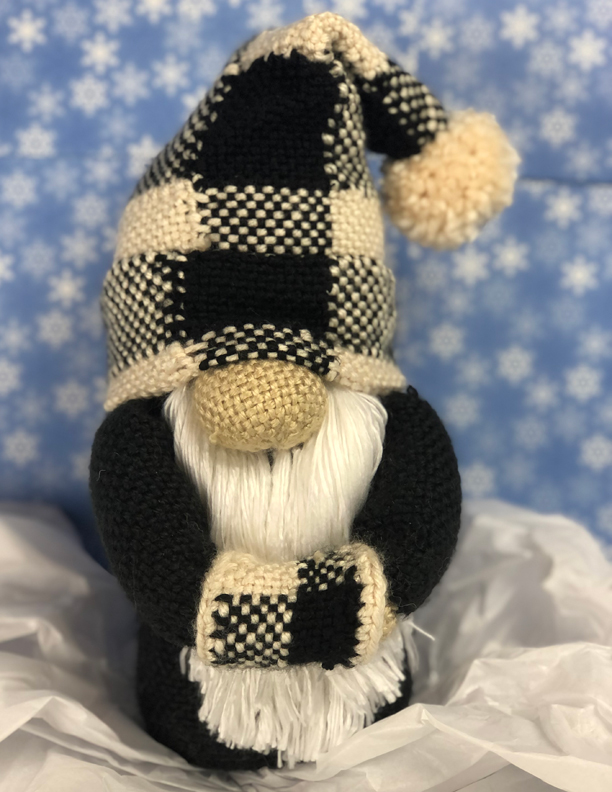
The Gingham Gnome pictured below is an example of a project pin loom woven in Red Heart Soft.
11. Warp The Loom: Loose and Looser
If the yarn has some elasticity (like wool and acrylic), then you want to warp (wrap the loom) loosely. If the yarn has no elasticity (like cotton and bamboo), then you want to warp the loom very loosely. Why? Because as you weave, the warp straights get tighter. By the time you weave the last few rows, the warp strands are very tight.
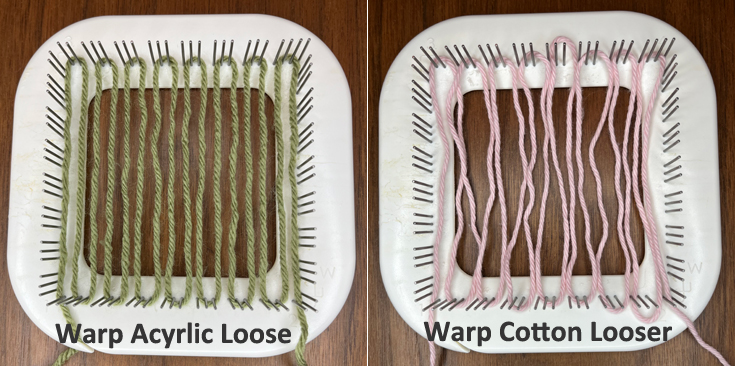
The photo above is the first warp using acrylic yarn (left) and cotton yarn (right).
For the acrylic yarn, you want to be able to press on the strands and feel it flex. The cotton is warped so loose that it lays on the table and looks really sloppy. We’d say they are both just about right. So definitely pay attention to the fiber content.
Conclusion
Phew, that’s quite a lot of information. As with anything, these are things we learned as we’ve spent time weaving. Your experience may be similar…or not. You may be nodding your head in agreement or may have found something that stopped to make you think.
Wishing you an enjoyable pin loom weaving experience.

